100 (or more) Computer Tips in 100 (or more) Days
Tip #114 - Replacing Text in Word & Publisher - Including Special Characters
A variation on Finding text in Word is Replacing text. Most people
will think about using this tool in their last proposal to change all of the
occurrences of “ABC Moving” with “Acme Moving & Storage”. While that is a
helpful use of Replace, I use it to clean up documents that I copy from the
internet or that clients send me. They are often filled with manual line breaks, extra spaces and unneeded
paragraph marks.
To use the Replace feature click the Replace option on the Home
tab, Editing group. In the dialog box click the More button on the left side
and then click the Special menu to view the options. If I wanted to replace all
of the manual line breaks with a space I would find “Manual Line Break” in the
list and click on it. Word inserts the code for that (^l) in the Find What box.
Now click in the Replace with box and tap the spacebar once. You won’t see
anything in the Replace with box but the character has been inserted. Now click
the Replace All button and all of the manual line breaks have been replaced with a space.
Once you use this a few times you don’t have to click on the More button and
Special, you can just type the code ^l (l for line break) and click on Replace
All.
Another code that I use frequently is ^p for Paragraph
Return. I am often sent documents that I need to import into
newsletters or brochures. The client has typed the document using two
returns after each paragraph. This has to be stripped out for my purposes. In the Find what box I will type ^p^p and in
the Replace with box I type one ^p. This is telling the program to find
every occurrence of the Return/Enter key being struck twice and change it to
one return, thereby removing the extra returns between the paragraphs.
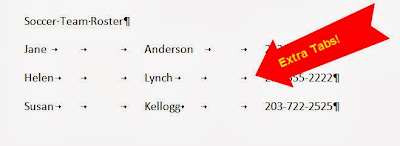
 Another example of this is when people get carried away
using the Tab key in an effort to make nicely spaced columns. They will create lists by typing something like the first
name at the left margin and then press the Tab key two or three times and type
the last name. They will again tab two or three more times before typing
the phone number or other piece of information. These extra tabs need to be
removed before this information can be put in a table or used in another
format. In the Find what box I will type the Tab code of ^t^t and in the
Replace with box I again use ^t. In this case I don’t want to remove all of the
tabs, just those areas of the document where there are multiple characters
together. After I click on the Replace all option I will often click on Replace
all again. I am reading the search report looking for zero replacements made. Then
I know that the document is free of these offending double (triple?) tabs.
 Happy Computing!
Diane
Don't forget to click the Subscribe to 100 Computer Tips in 100 Days via email link on the right side of the screen so you get email alerts when Diane adds a new post.
Want more tech news or interesting links? You'll get plenty of both if you keep up with Diane McKeever, the writer of 100 Computer Tips in 100 Days, by subscribing to her Facebook posts or visiting her web page, www.dianemckeever.com .


