Tuesday, May 21, 2013

Oops - Redo on Tip #103

Tip #103 on Bookmarking Browser Pages got published before I finished writing it! Oops. Thanks for all of your notes asking about it. Now I know that people are reading my tips ;-)  Please revisit it now that it's complete. Use the link above to get there quickly.

Sorry for the confusion.

Happy Computing!

Diane

Monday, May 20, 2013

Tip #103 - Bookmarking a Browser Page


100 Computer Tips in 100 Days

Tip #103 - Bookmarking a Browser Page


I spoke with two clients after posting the index for my blog. They both commented that they would bookmark the page if they knew how to do it! Of course the directions depend on which browser you're using. Some refer to Bookmarking as adding to Favorites. What ever it's called, it is the process that allows you to save website pages you've gone to in your browser. Generally these pages can be grouped together into folders or listed individually or added to a bookmark/favorites bar. The bookmark/favorites bar appears along the top of your browser window and should be used for webpages you use very frequently such as your email, calendar or facebook page. All of the browsers listed here use Ctrl + d (Command on the Apple) to add bookmark or favorite entries.

Internet Explorer
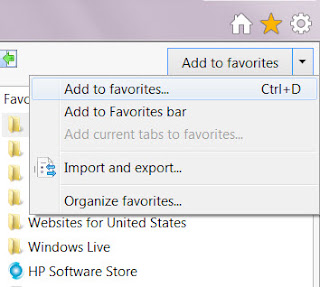
The Internet Explorer is one of the browsers that uses the term Favorites to help you quickly return to web sites you've visited. To add to the favorites, go to a page you want to add to your favorites list and click the yellow star in the upper right side of your screen. A drop down menu will appear. Click on Add to favorites to add the current page to your favorites list or to the Favorites bar. As you can see from the screen shot on the right, you can also add a page to your favorites list by using the keyboard command of Ctrl + d.


Mozilla Firefox
Mozilla Firefox uses the Bookmark menu to add bookmarks to its browser. Again you go to the page that you would like to bookmark and click on the bookmark menu. From the menu choose "Bookmark This Page". A further dialog box will appear so that you can choose whether this should appear on the bookmark menu or bookmark bar. From this dialog box you can also click on "Choose" to identify a specific folder for the bookmarks to be saved in or click New Folder to create a new folder group. Note in the screenshot to the left there are many folders that help organize saved bookmarks. This really helps if you are researching a topic and want to group your found pages. Note the use of Ctrl + d to add the bookmark using the keyboard.

Google Chrome
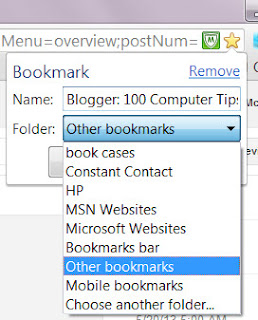
Like the Internet Explorer, Google Chrome uses a yellow star to bookmark a page. When you click the yellow star in the upper right side of the page a dialog box appears for you to choose where the bookmark will be saved. You also have an opportunity to edit the name that will appear in the list as well as choose between the bookmark bar or folders. Although it is not documented when you hover over the star, Ctrl + d will bring up the bookmark dialog box.


AOL Browser

Many people log on to AOL through a desktop icon and then use the browser in the AOL program. AOL uses the term Favorites and they use a red heart to add to the favorites menu. When you click the heart a further dialog box appears allowing you to choose where the newly identified page will be stores. Note the Favorites menu at the top right of the screen. Clicking on the Favorites menu gives you access to all of your stored favorites.


Safari
The Safari browser uses the term bookmark. Across the top of the screen you will see the Bookmark menu between History and Window. When you are at a page you would like to add as a bookmark, click the Bookmark menu and choose "Add Bookmark". As you can see from the screenshot, Command + d can be used as well. A further dialog box will allow you to choose whether the bookmark will appear in the menu or on the bookmark bar.

Hope this helps. Don't forget to bookmark those pages in my blog that you would like to revisit, such as the index page.

Happy Computing.

Diane

Don't forget to click the Subscribe to 100 Computer Tips in 100 Days via email link on the right side of the screen so you get email alerts when Diane adds a new post.

Want more tech news or interesting links? You'll get plenty of both if you keep up with Diane McKeever, the writer of 100 Computer Tips in 100 Days, by subscribing to her Facebook posts or visiting her web page, www.dianemckeever.com . 

Tuesday, May 14, 2013

Tip # 102 - FTP via Skype


100 (or more) Computer Tips in 100 (or more) Days

Tip #102 - FTP via Skype


Recently I had to send a BIG graphic file to China for a client but the file was too big to attach to an email. The provider asked if I had a Skype account (of course I did, how else can I see the grands) so we exchanged Skype names. 

After I had added his name to my contact list and double clicked on the name, I saw the plus sign button. Clicking on it gives you choices that include: Send File, Send Contacts, Share Screens and Add People.  Of course, I was looking to send a file so I chose that option that brought up the standard dialog box to choose the file. Once the file was chosen I then clicked on the Video call button. When the contact accepted the call the download started. A few minutes later a huge file had been transferred from FL to Shanghai, China!!! Isn't the internet a wonderful thing??? 

Hope you enjoyed this tip.

Happy Computing!

Diane

Don't forget to click the Subscribe to 100 Computer Tips in 100 Days via email link on the right side of the screen so you get email alerts when Diane adds a new post.

Want more tech news or interesting links? You'll get plenty of both if you keep up with Diane McKeever, the writer of 100 Computer Tips in 100 Days, by subscribing to her Facebook posts or visiting her web page, www.dianemckeever.com . 

Monday, May 13, 2013

Index

To make it easier to find your favorite tip, I've included a handy index of them. Hope you have enjoyed reading my posts ~~ Diane


Tip #1.      Basic Mouse Terms
Tip #2.      Browsing With a URL
Tip #3.      Using Tabbed Browsers
Tip #4.      Zooming Windows
Tip #6.      Save Versus Save As
Tip #7.      Selecting Text
Tip #9.      Stopping a Runaway Printer
Tip #13.    Freezing Panes in Excel
Tip #15.    Sorting In Excel
Tip #25.    Wrapping Text in Excel
Tip #26.    Indenting Text in Excel
Tip #30.    Addressing an Email
Tip #31.    Generating Random Text
Tip #32.    Google Math
Tip #33.    Creating Charts in Excel
Tip #37.    Picasa Photo Organizer
Tip #39.    Navigating In a Document
Tip #42.    Google Translate Tool
Tip #43.    Making Word Clouds
Tip #44.    Friend Lists in Facebook
Tip #52.    Screen Captures
Tip #53.    Excel Lists
Tip #57.    Free Anti-Virus Programs
Tip #58.    Format Painter
Tip #61.    Excel Data Validation
Tip #66.    Browser Page Navigation
Tip #67.    Excel - Defining Names
Tip #68.    Improving Computer Speed
Tip #76.    Lock Your Windows
Tip #78.    PowerPoint Show
Tip #79.    Multilevel Lists in Word
Tip #81.    Google docs
Tip #83.    Word – Track Changes
Tip #88.    Word – Styles
Tip #89.    Word – Document Map
Tip #91.    Three Finger Salute
Tip #93.    Excel Scenario Manager
Tip #96.    Excel – Filtering
Tip #98.    Snap To Default Answer
Tip #101. Recap of Keyboard Shortcuts
Tip #102  FTP via Skype
Tip #103  Bookmarking Browser Pages
Tip #104. Push Pinning Documents
Tip #107  Excel Pivot Tables
Tip #108 Microsoft Office Quick Access Toolbar
Tip #109  Gmail Changes
Tip #112  Printing Specific Pages - Save time, paper and ink


Happy Computing!  Hope you have enjoyed the journey ~~  Diane


Don't forget to click the Subscribe to 100 Computer Tips in 100 Days via email link on the right side of the screen so you get email alerts when Diane adds a new post.

Want more tech news or interesting links? You'll get plenty of both if you keep up with Diane McKeever, the writer of 100 Computer Tips in 100 Days, by subscribing to her Facebook posts or visiting her web page, www.dianemckeever.com . 

Friday, May 10, 2013

Tip #99 - Excel Finding Duplicate Records


100 Computer Tips in 100 Days

Tip #99 - Excel Finding Duplicate Records


I just had to compare two email lists. One was my Gmail contacts and the other was my Outlook contacts. I exported both of them to a file, deleted all but the name and the email fields and copied and pasted them into one file, but then what? Many of the names were duplicates but how to weed them out? Then I remembered the Find Duplicates feature in Excel!

This easy-to-use feature is on the Data tab, Data Tools Group (Data menu for Apple users). When you click the Find Duplicates option a window comes up asking in which columns you want to find duplicates. In my case I indicated only the email column but if you were trying to find all the duplicate records for people in the list with the same first AND last name, you would check those columns instead.  Than click the OK button. Poof, duplicates have disappeared. Excel will give you a report showing the number of duplicates found.

Remember, Excel deletes the duplicate records without confirming it so you might want to make a backup of the file before you delete the duplicates.

Happy Computing!

Diane

View Diane's Webpage for more tips. 


Don't forget to click the Subscribe to 100 Computer Tips in 100 Days via email link on the right side of the screen so you get email alerts when Diane adds a new post.

Want more tech news or interesting links? You'll get plenty of both if you keep up with Diane McKeever, the writer of 100 Computer Tips in 100 Days, by subscribing to her Facebook posts or visiting her web page, www.dianemckeever.com . 

Thursday, May 9, 2013

Tip #98 - Snap To Default Answer


100 Computer Tips in 100 Days

Tip #98 - Snap To Default Answer


The Snap To feature on your Windows computer automatically moves your mouse to the default answer in a dialog box. It can save you a lot of scrolling around the window when all you want to do is click OK or Save or whatever the blue outlined default answer is. It’s particularly helpful for laptops.

To turn Snap To on: 
  • Control Panel > Ease of Access > Ease of Access Center > Change How Your Mouse Works.  
  • Scroll down to the bottom of the window and click Mouse Settings. 
  • Click the Pointer Options tab and click the checkbox for “Automatically move pointer to the default button in a dialog box”. 
  • Click OK . 

Setting your mouse to move to the default answer
in a dialog box.
Apple users can download a program called Lazy Mouse to accomplish this. Lazy Mouse is free to try and $9.95 to buy.


If you think that’s a lot for a product that seems to do one thing, here’s another tip for you. Rather than moving your mouse to click on a default answer, you can accomplish the same thing that the software does by pressing the Enter/Return key. The Enter/Return shortcut works on both PC and Apple environments.

Happy Computing!

Diane

Don't forget to click the Subscribe to 100 Computer Tips in 100 Days via email link on the right side of the screen so you get email alerts when Diane adds a new post.

Want more tech news or interesting links? You'll get plenty of both if you keep up with Diane McKeever, the writer of 100 Computer Tips in 100 Days, by subscribing to her Facebook posts or visiting her web page, www.dianemckeever.com . 


Wednesday, May 8, 2013

Tip #97 - Excel – Concatenating Cells


100 Computer Tips in 100 Days

Tip #97 - Excel - Concatenating Cells


When managing list data in Excel it’s often necessary to combine the contents of one or more fields. The Concatenate function will accomplish this task for you.
Concatenate is a function in the Text category.

Imagine that you have a list that contains the first name and the last name of individuals.  Of course you want to separate this information into individual fields for sorting purposes but you might want to have them combined for exporting to a mail merge or for name tags. In this example we’ll take the last name, add a space and a comma and then insert the first name.

First you’ll want to insert a new column or use the last column in your list to combine the names. Next click the Insert Function button on the formula bar. From the Text category choose Concatenate and click OK.

In the Function Arguments dialog box enter the cell address for the first Last Name in your list. In the Text2 box enter a comma and a space (to separate our last name from the first name) and in the Text3 box enter the cell address for the First Name. Check the Calculation Result area to make sure it looks the way you want it to and then click OK. 


All you have to do now is fill it in down all the cells and of course you’ll do that by clicking on the cell that has the formula, moving your mouse to the lower right corner of that cell where the little fill handle is and double clicking the fill handle. Bam! The formula is copied down in all of the cells.

Now you can throw the word Concatenate into conversations and people will think you are a genius.

Happy Computing!

Diane

Don't forget to click the Subscribe to 100 Computer Tips in 100 Days via email link on the right side of the screen so you get email alerts when Diane adds a new post.

Want more tech news or interesting links? You'll get plenty of both if you keep up with Diane McKeever, the writer of 100 Computer Tips in 100 Days, by subscribing to her Facebook posts or visiting her web page, www.dianemckeever.com . 

Named Cells and Ranger in Excel

Great Computer Tips Named Cells and Ranges in Excel Naming cells Cells already have names such as A1, B27, etc. but you can also give them n...