Monday, November 25, 2013

Tip #116 - Spell-Checking in Your Browser

100 (or more) Computer Tips in 100 (or more) Days

Tip #116 - Spell-Checking in Your Browser

When you're filling in information using your browser, there is a spell check option that's available to help you. I noticed that when posting on Facebook or creating an email in my Gmail account, a red squiggly underline would appear below words that were not in the dictionary. This gave me a great sense of comfort
because I am not the best speller in the world. I got comfortable giving the word my best shot and the program would let me know if I was right or wrong. And then one day my lovely red squiggles stopped appearing. I knew that I hadn't suddenly learned how to spell so I figured out that somehow my spell checking tool got turned off...but where was the tool and how do I get it back on!

My initial thought was that the spell check option was in Gmail or Facebook but I couldn't find any documentation to support that. Then I remembered I had been having trouble with my Chrome browser and maybe that was the source of my problem...and it was. If you're not seeing the red squiggles when you're entering text in a multi-line text box...on any website...find the directions for your browser below and make sure your spell check is turned on. This is helpful not only for your email but it will help on websites such as Amazon, TripAdvisor or Yelp when you're writing reviews.

One more thing, when you see a squiggly red line, move your mouse on it and click with your right mouse button (Ctrl click in the Apple environment). A menu of choices will pop up including some suggestions for the correct spelling of the word. You might also consider using "Add to dictionary" for words that are spelled correctly but are not in the dictionary. If you do that you never see the squiggly line under that word again.

Here's the directions for four of the top browsers:

Google Chrome

Mozilla Firefox

Internet Explorer

Safari

I thought I would share an interesting observation with you about my blog. Twice as many people visit my blog using Chrome browser than the Internet Explorer, which is the second most used browser for visitors. It shows that I have very smart visitors.

Please share this tip with your spelling challenged friends, you'll be glad you did.

Happy Computing!

Diane

Don't forget to click the Subscribe to 100 Computer Tips in 100 Days via email link on the right side of the screen so you get email alerts when Diane adds a new post.

Want more tech news or interesting links? You'll get plenty of both if you keep up with Diane McKeever, the writer of 100 Computer Tips in 100 Days, by subscribing to her Facebook posts or visiting her web page, www.dianemckeever.com . 

Thursday, November 21, 2013

Tip #115 - Changing Your Orientation (in Word)

100 (or more) Computer Tips in 100 (or more) Days

Tip #115 - Changing Your Orientation (in Word)

Suppose you need to have some charts in your document and they need to be on landscape pages but the rest of your document is in portrait orientation. What are your options? I was working on a document in Microsoft Word like this recently and I wanted to insert a landscape page in the middle of a Word document, between two portrait pages. Of course some creative folks would just put the graphic in sideways since it prints out the same, but because more documents are being read on-line rather than being printed (right??) I wanted to make it easy to read. I didn't want to have to imagine the readers tilting their head to the left/right to view the chart.


Pages in Word document with different orientations.

Back "in the day" we would create two documents when we needed pages with different orientations, one for all of the portrait pages and the other for the landscape. It was challenging keeping the page numbers sorted out in these two documents but we didn't see any other alternative.  I don't remember exactly which version of Microsoft Word introduced the feature that allows for multiple page orientations but I believe it was either in 98 or 2000. The secret to making it work is Section Breaks!

For those of you who use the very popular press the Return/Enter key until you're on a new page method of pagination, it might come as a surprise that not only can you insert page breaks but you can insert section breaks in a word document. There are many reasons for section breaks but we'll only talk about their need when changing the page orientation.

To change the orientation of a page:
  • Click in the document where you would like to insert the landscape page.
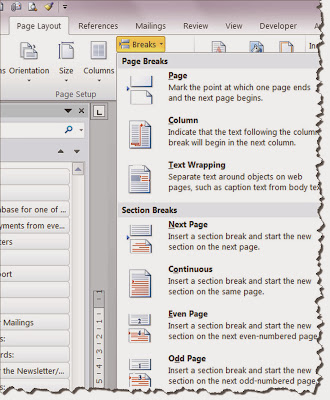
  • From the Page Layout tab, Page Setup group click the Breaks option.
  • From the Breaks list choose Section Breaks - Next Page.
  • Without moving your cursor choose Orientation - Landscape from the same area of the ribbon (Page Layout tab, Page Setup group).
  • The page that your cursor is on will now become a landscape page...and all of the pages following it (the current section) will also become landscape.
  • When you want to return to portrait orientation, insert another Section Break - Next Page and choose Orientation - Portrait.
You'll have to use the same steps to return to a portrait orientation if you don't want the rest of your document in landscape.

While you're looking at the types of Breaks available in Word. People mostly using either Page breaks or Section Breaks - Next Page. Note: You can insert a page break from your Keyboard using the Ctrl (Command) + Enter/Return keys. 

Promise me you'll insert page breaks rather than pressing the Enter/Return key until a new page appears. 

Happy Computing!

Diane

Don't forget to click the Subscribe to 100 Computer Tips in 100 Days via email link on the right side of the screen so you get email alerts when Diane adds a new post.

Want more tech news or interesting links? You'll get plenty of both if you keep up with Diane McKeever, the writer of 100 Computer Tips in 100 Days, by subscribing to her Facebook posts or visiting her web page, www.dianemckeever.com . 

Named Cells and Ranger in Excel

Great Computer Tips Named Cells and Ranges in Excel Naming cells Cells already have names such as A1, B27, etc. but you can also give them n...