Tuesday, April 30, 2013

Tip #89 - Word Document Map


100 Computer Tips in 100 Days

Tip #89 - Word Document Map


In the last tip we talked about using Styles in a document to quickly and consistently format a document. Another reason for using styles is so that you can view the Document Map for easier navigation and rearrangement of your document. My document for this blog would have been tedious to navigate if I didn't use the Document Map.

The Document Map for a Microsoft Word document
By applying Heading 1, 2 and 3 styles to my document, a hierarchical map was developed that I can display by clicking on the View tab, Show group, Navigation Pane. A pane appears on the left side of the screen that shows you the first few words using the paragraph style. I can click on the headings to navigate to that part of the document.

Beginning with the 2010 version of Word, in addition to navigation, I can move whole sections of the document around by dragging the headings up and down in the Document Map. No selecting, cutting and pasting, just drag the heading and release the mouse button. Because my title style included the numbering feature, my tips were automatically renumbered. This is important information for attorneys, engineers, architects and anyone else that uses numbered paragraphs.

Even if you don’t use formal styles in your document, Word will try to see if there is any pattern to the formatting of your document that would indicate heading levels. Open one of your old long documents and turn on the Document Map, you might be pleasantly surprised to see how easy it is to navigate your document.

-----------------------------------

My book, 100 Amazing Computer Tips - Shortcuts, Tricks, and Advice to Help Everyone from Novice to Professional, is available now at Amazon.com and Barnes & Noble in both print and ebook formats. 

Happy Computing!


Diane

Don't forget to click the Subscribe to 100 Computer Tips in 100 Days via email link on the right side of the screen so you get email alerts when Diane adds a new post.

Want more tech news or interesting links? You'll get plenty of both if you keep up with Diane McKeever, the author of 100 Computer Tips in 100 Days, by subscribing to her Facebook posts or visiting her web page, www.dianemckeever.com


Sunday, April 28, 2013

Tip #87 - Microsoft Office's Hidden Dialog Boxes


100 Computer Tips in 100 Days

Tip #87 - Microsoft Office's Hidden Dialog Boxes


When Office 2007 was introduced I thought the user interface was a great improvement over the classic menu driven access to commands. I also saw it as a huge training opportunity because everyone was confused about where their favorite commands had gone. Here it is six years later and people are still looking for their favorite options. Many of these options never made it to the ribbons. You can look as hard as you want, but your favorite option may be in one of the hidden dialog boxes.

 
Microsoft put these dialog box launchers in the lower right corner of the appropriate group. If you look at the Home tab, Font group you will see one of these little boxes. Clicking the launcher box will bring up the Font Dialog Box. Of course, you’ll see many of the choices from the ribbon but Small caps, for instance, isn't included on the ribbon. Click on the Advanced tab in the Font dialog box and you’ll see the Scaling and Spacing options.

Look around at the ribbons and you’ll see that many of the groups have a dialog box launcher.

-----------------------------------

My book, 100 Amazing Computer Tips - Shortcuts, Tricks, and Advice to Help Everyone from Novice to Professional, is available now at Amazon.com and Barnes & Noble in both print and ebook formats. 

Happy Computing!


Diane

Don't forget to click the Subscribe to 100 Computer Tips in 100 Days via email link on the right side of the screen so you get email alerts when Diane adds a new post.

Want more tech news or interesting links? You'll get plenty of both if you keep up with Diane McKeever, the author of 100 Computer Tips in 100 Days, by subscribing to her Facebook posts or visiting her web page, www.dianemckeever.com

Saturday, April 27, 2013

Tip #86 - Developing a Backup Strategy


100 Computer Tips in 100 Days

Tip #86 - Developing a Backup Strategy


One of the most disturbing days of a computer user’s life is the day that their computer dies. It’s a little known fact that every computer has a surprise expiration date and everyone needs to be prepared for when that day comes. I’m not suggesting that this is a real built in expiration date but just know that one day your computer will die without warning.

There are countless options available from free document back up to services that will back up the entire hard drive. All of these are better and more reliable than the external drive sitting next to your computer. This external local backup is popular because people feel it is more secure than using a remote location. But you should understand that commercial remote locations use a series of encryptions that make them extremely safe and secure. The most troubling aspect of local backup is that the backup device is in the same environment as the primary computer. If you get a power surge from a lightning strike it will blow out your computer and the backup.

Microsoft has Skydrive, which offers free cloud-based storage for documents and pictures.  There is a fee if you need more than 7GB of storage, but that’s a lot of free storage.

Amazon Cloud Drive provides 5GB of free storage. When it was first introduced, you could also use it to stream music. Now that functionality is in a separate service: Amazon Cloud Player. With this latter service, you can upload and stream up to a rather minimal 250 songs to Windows PCs, Macs, and Apple and Android devices.

Apple iCloud comes with 5GB of free storage, but it's more than just storage. Music, apps, books, and TV shows you purchase from the iTunes store, as well as your Photo Stream, can also be stored and streamed from it, and none of the purchased media counts against your storage quota.

There are also paid services, such as Carbonite (www.carbonite.com) that you might consider. The advantage of these services is that they automatically back up everything on your computer without having to store files in special folders as you do with the other services. If your computer dies-- OK when your computer dies -- you buy a new computer, log on to your Carbonite account and click the “Restore” button. All of the files that were on your old computer are transferred to your new computer automatically.  This is the service that I use and feel it’s well worth the $60 a year. They do offer multiple computer discounts.

I don’t want to be there when you realize that all of those pictures of your kids, grands or pets just evaporated so, please, do something to back up your documents now.

Happy & Safe Computing!

-----------------------------------

My book, 100 Amazing Computer Tips - Shortcuts, Tricks, and Advice to Help Everyone from Novice to Professional, is available now at Amazon.com and Barnes & Noble in both print and ebook formats. 

Happy Computing!


Diane

Don't forget to click the Subscribe to 100 Computer Tips in 100 Days via email link on the right side of the screen so you get email alerts when Diane adds a new post.

Want more tech news or interesting links? You'll get plenty of both if you keep up with Diane McKeever, the author of 100 Computer Tips in 100 Days, by subscribing to her Facebook posts or visiting her web page, www.dianemckeever.com

Friday, April 26, 2013

Tip #85 - Windows Aero Snap Feature


100 Computer Tips in 100 Days

Tip #85 - Windows Aero Snap Feature


If you have Windows 7 or a later version, you can use Aero Snap to arrange windows side by side, which can be especially helpful when comparing two documents or when moving files from one place to another. With Aero Snap you can grab a window from the Title Bar and move your mouse to the left or right edge of the screen and the window will resize to fill half the screen. Repeat with a second window, this time going to the opposite side of the screen. Now with two easy motions you have a setup that makes both of these screens visible.
 
Windows being snapped left and right using Aero Snap
In researching this tip I learned that you can also accomplish this from the keyboard, making it even easier. Click on one of the windows to make it active and from your keyboard hold down the Windows key and press the left arrow key.  Now click the other window and use the Windows key and the right arrow key. Shazam! Windows key and the up arrow returns the window to a maximized position.

Apple people have been a little envious about the ability to accomplish this in the Windows environment but it was not part of the Apple OS. You can download something called “cinch” from the Apple store (less than $10), which will allow Apple computers to accomplish the same thing.

Bonus brownie points for anyone who can identify which TV character used to say Shazam! Leave your guess in the comments area of the blog.

-----------------------------------

My book, 100 Amazing Computer Tips - Shortcuts, Tricks, and Advice to Help Everyone from Novice to Professional, is available now at Amazon.com and Barnes & Noble in both print and ebook formats. 

Happy Computing!


Diane

Don't forget to click the Subscribe to 100 Computer Tips in 100 Days via email link on the right side of the screen so you get email alerts when Diane adds a new post.

Want more tech news or interesting links? You'll get plenty of both if you keep up with Diane McKeever, the author of 100 Computer Tips in 100 Days, by subscribing to her Facebook posts or visiting her web page, www.dianemckeever.com


Thursday, April 25, 2013

Tip #84 - Copying Text from the Internet


100 Computer Tips in 100 Days

Tip #84 - Copying Text from the Internet


So you’re getting ready for vacation and you have found lots of good information on a variety of web pages. The most common thing people do is to print out the entire web page, all eight pages, even though you only wanted the information on page three. A way around this is to select just the information you need, copy it and paste it into a word document. That’s what we’re going to do today.

In preparation you should open your word processing program, whatever program that might be. Also open a web browser, again whichever program is your favorite. Use the search engine to find a webpage that has interesting information for you to copy. This could be a recipe, directions, or travel recommendations. After you have identified the information you would like to copy you need to select it. Do not use the select all command, because you will select too much information and it will be unmanageable.

You should use the click – shift click method to select the text. You might remember from an earlier tip that when we want to select a range of text we click (yes, a regular left click) at the beginning of the text, scroll down to the end of the text area, hold down the Shift key and click at the end. You need to make sure the Shift key is held down before you click at the end of the text. Now that the text is selected you will copy it. Use the keyboard shortcut of Ctrl (Command)+ c. I know it doesn’t look like anything has happened but remember that copy puts information on the Clipboard, a holding place in the computer’s memory. Now switch over to your word processing program. On the windows machines use the task bar along the bottom of your screen, in the Apple environment click the program on the docking area along the bottom. Once your word processing program is up we’ll use the paste command of Ctrl (Command) + v.

Now go back to your webpage and get some more text using the same technique. Happy copying and pasting.

Happy computing!

View Diane's Webpage for more tips. 


Wednesday, April 24, 2013

Tip #83 - Word Track Changes


100 Computer Tips in 100 Days

Tip #83 - Word Track Changes


Track Changes is a valuable tool in Word that allows you to keep track of all of the revisions you make to a document so that you can easily identify them. This feature is most frequently used by people sharing documents. One person creates the document and send it to another for editing. The second person turns on Tracking Changes, makes the changes, saves them and return the document to the first person. The originator of the document is able to clearly see the editing changes. In addition, the originator is able to go through the document revision by revision accepting or rejecting the changes.


 If more than one person needs to make changes than each person would to make sure that Tracking Changes was on. Then their revisions will automatically be made in a different color, making it easy to see all of the revisions made by an individual. Moving your mouse on a revision will also show you the name of the individual and the date and time the revision was made.

To turn on Track Changes go to the Review tab and in the Tracking group click on Track Changes. Then click on Balloons (to the right of Track Changes) to see the options for how to show the markup.  My preference is to show the revisions in line. 

Happy Computing!

Diane

Don't forget to click the Subscribe to 100 Computer Tips in 100 Days via email link on the right side of the screen so you get email alerts when Diane adds a new post.

Want more tech news or interesting links? You'll get plenty of both if you keep up with Diane McKeever, the writer of 100 Computer Tips in 100 Days, by subscribing to her Facebook posts or visiting her web page, www.dianemckeever.com . 


Tuesday, April 23, 2013

Tip #82 - Outlook - Adding Contacts from an Email


100 Computer Tips in 100 Days

Tip #82 - Outlook - Adding Contacts from an Email


I find it amusing when I go to an office or home and see little pieces of paper around with email addresses written on them. When I inquire about them I’m told that the individual was making a note of the email address so that they could type it in their address book. Hum, I see another training moment!

Microsoft makes it really easy for you to add email addresses as long as you have an email from that person.  
  • Find that person’s email and double click to open it in its own window.
  • Move your mouse on to their address in the email and click with the right mouse button.
  • From the menu choose “Add to Outlook Contacts”.
  • The new contacts window will appear with the name and email address already populated. Add any further information and click the Save and Close option.

That’s it. That person has been added to your contacts! No more little pieces of paper with email addresses scribbled on them.

-----------------------------------

My book, 100 Amazing Computer Tips - Shortcuts, Tricks, and Advice to Help Everyone from Novice to Professional, is available now at Amazon.com and Barnes & Noble in both print and ebook formats. 

Happy Computing!


Diane

Don't forget to click the Subscribe to 100 Computer Tips in 100 Days via email link on the right side of the screen so you get email alerts when Diane adds a new post.

Want more tech news or interesting links? You'll get plenty of both if you keep up with Diane McKeever, the author of 100 Computer Tips in 100 Days, by subscribing to her Facebook posts or visiting her web page, www.dianemckeever.com

Monday, April 22, 2013

Tip #81 - Google docs


100 Computer Tips in 100 Days

Tip #81 - Google docs


Google Docs is a versatile cloud-based service that features an array of office applications that compete with Microsoft Office. Since it is cloud-based there is nothing to download. All you need is a Google account which can be setup using any email address -- g-mail is not required. Once you lo

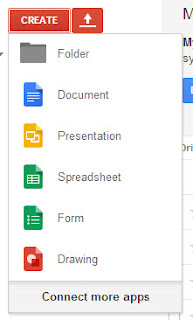
g on to your Google account, use the Drive option along the top left of the screen to access the Google docs area. Click the Create button to choose the type of document you would like to start. The new document opens in a new tab in your browser.

Your choices for a new document include word processing (Document), spreadsheet (Spreadsheet) slide presentation (Presentation), form (Form) and even a drawing tool (Drawing). The drawing tool enables you to quickly scribble a rough design for a new idea or build a flowchart using shapes and lines. You can insert these drawings into your documents, spreadsheets and presentations. The spreadsheet application features custom formatting for spreadsheets, charts and gadgets. The presentation program allows you to enable real-time viewing of presentations, online, from separate remote locations. You can also add images, slides and videos and embed your presentations in a website, which will provide them access to a wide audience.

But not only do you have a complete cloud-based office at your disposal, you can also upload your creations and share them with people online, using real time chat to communicate and collaborate back and forth. I recently invited a class to make changes to a document. The participants were able to see on the projected screen, all of the changes that were being made simultaneously by everyone in the room!

As you can see, Google docs gives Microsoft a real run for the money, and Google docs is FREE.  And this also works on iPads and other tablets, allowing you to use them to create documents, spreadsheets and presentations and email and share them – without turning on your laptop or computer.

---------------------------


My book, 100 Amazing Computer Tips - Shortcuts, Tricks, and Advice to Help Everyone from Novice to Professional, is available NOW at Amazon.com and Barnes & Noble in both print and ebook formats. There's also a handy link on top right side of this window.

Happy computing!

Diane


Don't forget to click the Subscribe to 100 Computer Tips in 100 Days via email link on the right side of the screen so you get email alerts when I add a new post.

Sunday, April 21, 2013

Tip #80 - Outlook Rules


100 Computer Tips in 100 Days

Tip #80 - Outlook Rules


One of the most difficult tasks that people have is to handle the large volume of mail they receive each day. There is a feature in Outlook that can help with this onslaught: Rules.  It offers various options. You can set rules for all of the emails from a person or group to automatically be moved to a specific folder, or one that plays a special sound when an email comes in from your boss or you can have a rule that forwards an email and then deletes it. Once you get the hang of them you’ll have all kind of rules. 


The easiest way to create a rule is to find a message in your mailbox that is an example for the rule and would be affected by the rule such as an email from your boss or from a listserve or, in the example shown here, from Bed Bath and Beyond. I want to create a rule that whenever an email comes in from Bed Bath and Beyond it goes directly to my “offers” folder where I keep emails from stores I frequent. When I have time I’ll look through this folder but I don’t want them cluttering up my inbox.

  • Move your mouse on the email in the list and click with the right mouse button.
  • Choose Rules, Create Rule…
  • Select the conditions and identify the appropriate action and click OK
  • A window will appear asking if you would like to run the rule on the emails currently in your inbox. Running the rule is generally a good idea because it will test the rule.


That’s it. The next time an email comes in to my inbox from Bed Bath and Beyond it will be gone, straight to the “offers” folder. You can use a rule to delete mail from someone who won’t take you off their mailing list. Just create a rule that their mail goes straight to the deleted items folder.
---------------------------


My book, 100 Amazing Computer Tips - Shortcuts, Tricks, and Advice to Help Everyone from Novice to Professional, is available NOW at Amazon.com and Barnes & Noble in both print and ebook formats. There's also a handy link on top right side of this window.

Happy computing!

Diane


Don't forget to click the Subscribe to 100 Computer Tips in 100 Days via email link on the right side of the screen so you get email alerts when I add a new post.


Saturday, April 20, 2013

Tip #79 - Multilevel Lists in Word


100 Computer Tips in 100 Days

Tip #79 - Multilevel Lists in Word


For those times when you need to make an outline or other kind of multilevel list, Word has a dandy feature to help you. On the Home tab ribbon you’ll find the multilevel list option in the Paragraph group. Clicking on the down triangle reveals the assortment of lists that are available including numbered and bulleted lists. But that’s not all. These basic list types can be customized. 


Clicking on one of the choices will insert the first level of the list. Pressing the Enter/Return key will duplicate the level that you were just using. For example if you are using a multilevel list that has numbers, the first paragraph will have a “1” inserted at the beginning and pressing the Enter/Return key will insert the number “2”.  To indent to the second level you need to press the Enter/Return key, which will repeat the previous level, and then you press the Tab key. The Tab key indents you to the second level which might then insert a lower case “a”, if that’s the style you chose. When you have finished entering all of your second level entries you press the Enter/Return key again and then use a Shift Tab (holding down the Shift key and pressing the Tab key) to return to level 1. 

An alternative to using the Tab and Shift-Tab keys is the indent options on the Home tab, just to the right of the multilevel list option.

I sometimes find it easier to format the list after I've typed it. I turn on the multilevel list feature and then just type it as one long list. I then select all of the text that needs to be indented and click on the increase indent option. I find Word plays nicer using this approach.

---------------------------


My book, 100 Amazing Computer Tips - Shortcuts, Tricks, and Advice to Help Everyone from Novice to Professional, is available NOW at Amazon.com and Barnes & Noble in both print and ebook formats. There's also a handy link on top right side of this window.

Happy computing!

Diane


Don't forget to click the Subscribe to 100 Computer Tips in 100 Days via email link on the right side of the screen so you get email alerts when I add a new post.


Friday, April 19, 2013

Tip #78 - PowerPoint Show


100 Computer Tips in 100 Days

Tip #78 - PowerPoint Show


The next time you create a PowerPoint presentation (.pptx) consider saving it one last time as a PowerPoint Show (.ppsx). The advantage of a PowerPoint Show is that when you double click on the file, it opens immediately into the show view and you will not need to manually turn on the slide show. Now on the face of it that doesn't seem like much of an advantage but here’s the important thing to consider, anyone double clicking on the file would be in the slide show view. So if you were to attach your PowerPoint Show to an email, the file would open and run when the recipient double clicked on it, even if they didn't have PowerPoint on their computer.

To get the greatest impact from this you should add timings to your presentation so it runs automatically or somehow let the viewer know that they have to click to move through the show. You can accomplish this by adding back/forward arrows or just adding a note on the first slide telling the viewer to click to advance through the presentation. Any animations or transitions you added to the show would still be active.  You can get really fancy and add a voiceover to the presentation.

PowerPoint Shows are particularly popular around the holidays showing snowy scenes indicating when you need to click to view the lights going on in the house or to click on the reindeer’s nose to see it light up, etc. These files are generally a PowerPoint Show.

---------------------------


My book, 100 Amazing Computer Tips - Shortcuts, Tricks, and Advice to Help Everyone from Novice to Professional, is available NOW at Amazon.com and Barnes & Noble in both print and ebook formats. There's also a handy link on top right side of this window.

Happy computing!

Diane


Don't forget to click the Subscribe to 100 Computer Tips in 100 Days via email link on the right side of the screen so you get email alerts when I add a new post.


Thursday, April 18, 2013

Tip #77 - Outlook Scheduling Email Delivery


100 Computer Tips in 100 Days

Tip #77 - Outlook Scheduling Email Delivery


It should not surprise anyone that when you create an email and click the Send button (or Ctrl + Enter) the message is sent. But did you know that you can schedule an email message to be sent at a specific date and time in the future. I always thought this would make a good alibi if you were writing a mystery novel. “No detectives, I couldn't have done what you’re accusing me of; I was here sending emails all evening!”


When you create a new email one of the options available from the Options tab is to delay delivery. When you click the option you will see the options dialog box where you can choose the date and time to deliver the message. It’s important to note that your Outlook program must be open in order for the message to be released from your Outbox.

While you’re in this dialog box notice some of the other delivery options. They include having replies sent to another individual. This is helpful if you plan on being out of the office and want someone else to receive replies to a specific email.

---------------------------


My book, 100 Amazing Computer Tips - Shortcuts, Tricks, and Advice to Help Everyone from Novice to Professional, is available NOW at Amazon.com and Barnes & Noble in both print and ebook formats. There's also a handy link on top right side of this window.

Happy computing!

Diane


Don't forget to click the Subscribe to 100 Computer Tips in 100 Days via email link on the right side of the screen so you get email alerts when I add a new post.


Wednesday, April 17, 2013

Tip #76 - Lock Your Windows


100 Computer Tips in 100 Days

Tip #76 - Lock Your Windows


Windows Key
Quick, someone is coming, lock your windows! Or maybe you have to dash off and you don’t want to close or hide your windows, but you do want to lock your windows so that no one can access your computer. Well if either of these scenarios sounds good to you then you need to know about Windows + L. I’m referring to the Windows key, the one with the Windows logo on it.

When you try it you will find it gets you to the sign on screen. If you have added a password to your account your computer will be safe until you return. If you haven’t added a password but would like to add one now, click the Start button in the lower left of your screen and choose Control Panel, User Accounts and Family Safety. Click on User Accounts and then Change Your Windows Password.  Lastly click, Create a Password for your account. You’ll have to type the new password twice. Now when you lock your computer you will have to enter the password to unlock it.
 
On the Apple you have a couple of ways to go to lock your computer. One way is to activate a padlock that will be displayed on the Right Hand menu bar and the other is to set a hot corner.

If you choose "Show Status in Menu Bar" from Keychain Access, Preferences, General you will get a little padlock in the Right Hand menu bar. This has a menu "Lock Screen, …" which will automatically switch to the screensaver and require entry of a password to get back (it does allow switching to another user if Fast User Switching is enabled).

The second Apple strategy is to set a “hot corner” for your screen saver so that when you drag your mouse to that corner the screen saver comes on. You also need to set your screen saver so that it requires a password to return to your computer session.

Click the Apple menu in the top-left corner of the screen, select System Preferences, then click the Mission Control icon. Click the “Hot Corners” button, and you’ll see a new window with four pull-down menus, one for each of your hot corners.

Select an option for one or all four corners. Among your choices: Mission Control, Application Windows (which highlights all the open windows for the application you’re currently using), Desktop (revealing the desktop), Dashboard (which turns on the Mac’s panel of “dashboard” widgets), Launchpad (the new iPhone-like launcher for the apps installed on your Mac), Start (or Disable) Screen Saver, and Put Display to Sleep.

Remember that you can choose the same action for two or more hot corners, if you wish. And to keep a corner cold, just choose the “-” option.  When you’re done, click the OK button.

---------------------------


My book, 100 Amazing Computer Tips - Shortcuts, Tricks, and Advice to Help Everyone from Novice to Professional, is available NOW at Amazon.com and Barnes & Noble in both print and ebook formats. There's also a handy link on top right side of this window.

Happy computing!

Diane


Don't forget to click the Subscribe to 100 Computer Tips in 100 Days via email link on the right side of the screen so you get email alerts when I add a new post.


Tuesday, April 16, 2013

Tip #75 - Important Microsoft Word Tips


100 Computer Tips in 100 Days

Tip #75 - Important Microsoft Word Tips


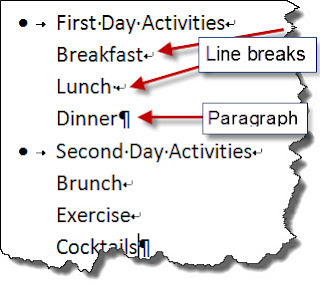
I see a lot of frustration when people are creating documents that have bullets and numbered lists. One of the things that makes bullets and numbered lists so convenient is that when you press the Enter key, you automatically get a new bullet or number. Well that’s all well and good but suppose you just want a new line, not a new bullet or number. Ah, here’s the secret.

When you press the Enter key you are creating a new paragraph and the new paragraph carries the same formatting (bullets/numbering) as the previous paragraph. To get a new line you need to hold down the Shift key and tap the Enter key. This is particularly helpful when you want to create second lines below bullets and numbers. This new line is sometimes called a “soft return”. I can see your blood pressure lowering already.

Another helpful keyboard shortcut in Word will give you a manual page break so that you don’t have to press the Enter (Return) key X# of times until a new page miraculously ma
terializes. When you want to get a new page hold down the Ctrl key and tap the Enter key.  The beauty of this is if you add information above the page break you just inserted, the words on the next page will not bump down too. On the Apple you’ll have to work a little harder. A page break is Fn + Shift + Return. You hold down the Fn and Shift keys at the same time and press the Return key.


Monday, April 15, 2013

Tip #74 - Changing Your Desktop Picture


100 Computer Tips in 100 Days

Tip #74 - Changing Your Desktop Picture


Probably the most important thing you need to have is a good desktop picture, one that’s appealing to you. Whether it’s your dog, child/grandchild, favorite destination or just a plain color, you look at your desktop all the time so it should be a good choice for you. This process couldn't be easier on the PC, and only a little more complicated on the Apple.

On the PC all you need to do is locate a picture anywhere on your computer and click with the right mouse button. One of your choices from the menu will be “Set as Desktop Pattern”. When you hide all of the windows you have open (remember windows key + d) you will see your new desktop picture. Remember to choose a picture that is big enough --that it has enough pixels, or the desktop picture will appear dotty.

If you have an Apple you can follow these steps. 
  1. From the Apple menu, choose System Preferences. 
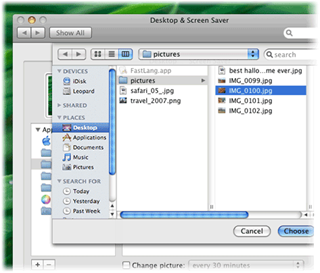
  2. In the window, click Desktop & Screen Saver, then click the Desktop tab to display just the desktop preferences. 
  3. If you want to use a photo from your iPhoto Library, select Library in the left pane. Otherwise, select Choose Folder, navigate to and select the folder that contains your image, and click Choose.  
  4. In the right pane, click any thumbnail to place the image on the desktop. 
  5. Depending on the size of your chosen image, you can opt to tile or center it if it's small. Note: Your image will look pixelated or have jagged edges if it's too small. Or have the image fill the screen, or stretch to fill the screen. Just choose an item from the pop-up menu that appears above the thumbnails, the one next to the thumbnail of your current picture. 

It’s so simple you can change the desktop picture daily! Oh yes, some people do.

My book, 100 Amazing Computer Tips - Shortcuts, Tricks, and Advice to Help Everyone from Novice to Professional, is available NOW at Amazon.com and Barnes & Noble in both print and ebook formats. There's also a handy link on top right side of this window.

Happy computing!

Diane


Don't forget to click the Subscribe to 100 Computer Tips in 100 Days via email link on the right side of the screen so you get email alerts when I add a new post.


Named Cells and Ranger in Excel

Great Computer Tips Named Cells and Ranges in Excel Naming cells Cells already have names such as A1, B27, etc. but you can also give them n...