100 (or more) Computer Tips in 100 (or more) Days

I was reminded of this tip when my phone started ringing and my inbox filled up with requests for my Mail Merge tip card. Everyone is using Mail Merge this month to get the labels printed to mail the Christmas - Hanukkah - New Year's cards and newsletters. The process is not that difficult but there are, of course, some pitfalls that you can fall into. Let's start with a description of a mail merge.
Mail Merge
Mail Merge is the process of taking a single form letter, combining it with a list of names and other information, and then merging both to create several customized documents. The results of a mail merge are generally personalized letters and labels. This post will assume you want to create labels. If you need something else I think you will be able to do that after following these instructions.
 The file that contains the names and other information is the data source. The file that contains the form letter/label template is the main document.
Documents in a Mail Merge
- Data sources with recipient information, such as names and addresses
- Main document with merge fields that are placeholders for recipient information
- Resulting merged document
Task Pane
This feature of Word is executed by following the directions in the Task Pane. The Task Pane appears on the right side of your screen when the Mail Merge task is selected.
Getting Started
Create a data file. I recommend using Excel for the data file. Even if you've never used Excel before, it's easy to put names and addresses in the columns and rows of an Excel document. Look at some Excel tips, such as auto-resizing columns for assistance. Make sure that row 1 in the Excel document has the column labels such as "first name" and "last name". You will use these in step 4 of the mail merge to identify what information goes where.
Getting Started
 To make the mail merge process easier we will use the Mail Merge Task Pane. The Task Pane will walk you through the six steps necessary to complete the merge. While it is possible to do a mail merge without bringing up the task pane I don't recommend it.
In Word 2007 or newer
Click the Mailings Tab —> Click the “Start Mail Merge” option —> Step by Step Mail Merge Wizard.
In either version, the task pane will appear on the right side of the screen. Apple users will see a floating pane that will have the numbers one through six. As we walk through the steps you will go to each section.
Steps in the Mail Merge Task Pane
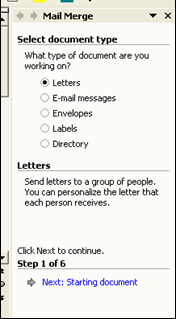
Step 1 – Select document type: letters, email messages, envelopes, labels, or directory. In our example, we will be making mailing labels.
- Letters – personalized letters
- Email messages – Outlook messages
- Envelopes – mailing envelopes
- Labels – any type of Avery-type labels
- Directory – a catalog of information such as a telephone directory
·
Step 2 – Click “Next: Starting document” – set up the document by choosing label type or document type.
In the Label Options dialog box, in the Label Vendors section choose "Avery US Letter". When you do this you will see all of the hundreds of Avery labels listed. Look at the box of labels you bought and check the number you should be looking for. Avery 5160 is the most popular size resulting in a sheet of 30 labels per page in three columns. When you return to your document after choosing the label template you should see your document divided into cells. NOTE: If you can not see the cell gridlines click on the Table tab, Format, and choose View Gridlines.
In the Label Options dialog box, in the Label Vendors section choose "Avery US Letter". When you do this you will see all of the hundreds of Avery labels listed. Look at the box of labels you bought and check the number you should be looking for. Avery 5160 is the most popular size resulting in a sheet of 30 labels per page in three columns. When you return to your document after choosing the label template you should see your document divided into cells. NOTE: If you can not see the cell gridlines click on the Table tab, Format, and choose View Gridlines.
·
Step 3 – Select recipients — this step is asking you to identify the file where the names are coming from.
Click Browse and find your file. If you are choosing an Excel document a second window will appear after you click open. This second window confirms the name of the sheet in Excel. Most people will use Sheet1.
A third window will appear with the Excel information. Use the checkboxes to exclude individuals from the mail merge. The data can also be sorted by clicking on the column headings. Click OK.
Hope this helps.
Diane
Want more tech news or interesting links? You'll get plenty of both if you keep up with Diane McKeever, the writer of 100 Computer Tips in 100 Days, by subscribing to her Facebook posts or visiting her web page, www.dianemckeever.com .
Step 4 – Arrange document – Insert the fields into the main document
- In Word for Apple, drag the fields from the Mail Merge Palette on to the document.
- In Word 2007 or newer click the Mailings Tab — Insert Merge Fields option - make sure you click on the WORDS Insert Merge Fields and not the button itself. If you click on the button a dialog box will appear. If it does just cancel and click the words. Insert each field in the order you want them on the label. Insert spaces and returns between fields where necessary. Don't worry if the text wraps, it probably will be OK when the merge is completed.
- If creating labels, Click the Update All Labels button to add the same fields to all labels. This is also an opportunity for you to add graphics, change fonts, etc.
- If any adjustments are needed, click the Previous hyperlink to return to step 4 and make adjustments
- Print – will print the list (labels or document)
- Edit individual labels (letter) – creates a file you can save and edit and use again. This is the option that I strongly recommend.
à Choose All records, (recommended) a Current record, or identify a range of records, click OK
A new document appears with all of the names merged. This is the document you will print. Saving it is a good idea. Scroll through this merged document making any changes necessary to the individual labels.Hope this helps.
Please share this tip with your friends, they'll thank you for it.
Happy Computing!
Happy Computing!
Diane
Don't forget to click the Subscribe to 100 Computer Tips in 100 Days via email link on the right side of the screen so you get email alerts when Diane adds a new post.
Want more tech news or interesting links? You'll get plenty of both if you keep up with Diane McKeever, the writer of 100 Computer Tips in 100 Days, by subscribing to her Facebook posts or visiting her web page, www.dianemckeever.com .


No comments:
Post a Comment