Wednesday, December 17, 2014

Speeding up Your iPad and iPhone


Speeding up your iPad or iPhone

Have you noticed that your iPad or iPhone have gotten sluggish? Are you using up your battery life at an amazing rate? If so you may be suffering from too many open apps! Most users don’t close apps when they are through but rather tap the Home button and open another. The previous app is still open but in sleep mode. The result is that you might have many apps open that you’re not using, but they are taking up memory and might be using up your battery.

I was reminded of this recently when I visited with my grandchildren and looked at their iPad. I checked which apps were open and discovered that they had a dozen or more open, including some known memory hogs. Since they are three and five years old, they will tap on anything and, of course, will not close out.

Quitting apps is really simple. Just double tap the Home button. You will see thumbnails of each open app. Simply scroll left or right until you get to an app you’re not using. Flick your finger from the middle of the page to the top and the app will close! It’s that simple.


You can use the double tap on the Home button to switch between apps too. Instead of flicking the page up, tap it and the app will wake up.

If you want to really clean up your device, close all of the apps and then reset it. Don’t worry, no data will be lost when you reset. To reset hold the Sleep/Wake and Home buttons…don’t let go until the screen goes dark and the Apple logo appears. That’s it. You will have a refreshed device!


I discovered this tip while working on another book, 100 MORE Amazing Computer Tips. This second book will have lots of iPad, Gmail and Windows 8 tips along with general computer advice. While waiting for it to arrive at Amazon, why don't you buy my current book, 100 Amazing Computer Tips. It's available at Amazon.com as well as Barnes & Noble in both print ($14.99) and ebook ($7.99) versions. The tips in it are for both Apple and PC users. There's also a handy link on the top right side of this window for your shopping convenience.


If you have already bought a copy of my book, THANK YOU! I hope you would consider writing a review on Amazon.com.

Happy computing!

Diane

Don't forget to click the Subscribe to 100 Computer Tips in 100 Days via email link on the right side of the screen so you get email alerts when I add a new post.

Monday, August 18, 2014

Amazing Tips - Punctuation and special characters on smart devices

Amazing Tips - Punctuation and Special Characters on the iPad, Tablet or Smartphone 

For those who like to use punctuation, accents and more!

Now I am aware that punctuation is falling by the wayside, heck, not just punctuation but writing in complete sentences is too! For those of you who still care, here are some amazing tips to use with your smart device (phone, iPad, tablet, or just about anything with a touch keyboard).

Recently, while writing a message on my smartphone, I held down the period key for an extra beat and up popped a menu of choices.  Because I was so surprised to see a menu appear, and because the menu disappeared very quickly, I didn't see the options, so I held the period key down again. This time I was able to observe some of the choices. They included the dash, colon, apostrophe, question mark, exclamation point, @ sign and more. Who knew that? I've had a smart phone for years and have always switched to the numeric keyboard to get these alternative characters.

That got me thinking about what other keys were special on my phone. I discovered that when I held down the vowel keys (a, e, i, o and u) the menu displayed accented characters for keying in foreign words such as résumé or déjà vu. This was getting interesting, what else was there I wondered. Since my finger was on the top line of letters, I held down a non-vowel key and saw a number popped up as an alternative. Turns out you don’t need to switch to the numeric keyboard to type numbers just hold down one of the ten keys on the top row and you can insert the numbers one through 0!
Most of the other consonant characters didn't hold any secrets but the c and n showed accented letters while the s revealed a ß. I’m not sure when you use one of those but if you've been looking for it, now you know where it is.

Well I thought if the alpha keyboard had secrets, could the numeric keyboard be hiding its own group? So off I went to the numeric keyboard, holding down the number keys. Yes, more secrets were to be found here! The 1, 2, 3, 5, 7 and 0 keys were hiding fractions! Not that I include many fractions. In fact I can't really remember when I last inserted a fraction in an email or message, but now I know where to find them.  I continued my journey of the numeric keyboard and was rewarded when I got to the dollar sign and percentage keys where I discovered foreign currency symbols and the ‰ character. The dash has em and en dashes, the plus also had a ± and the parenthesis characters reveal brackets as well as < and > symbols.

Moving on to the bottom row I found that the asterisk can also be used to insert daggers(†) , double daggers (‡) and stars! The apostrophe and quotation keys had variations on those signs and the exclamation point and question mark keys had the upside down variations.

Once I was finished exploring my smartphone I wondered whether or not this alternate keyboard universe applied to any other devices. I had an iPad nearby so I started holding down on some of the keys and found a similar phenomenon! Not all of the options were the same but enough were to make it worth exploring if an iPad is your device of choice. I don’t have a touchpad tablet handy but I’m willing to bet that it holds similar secrets. Write in the comments section if you find that these tips work on a tablet too. 

Split your iPad keyboard


While I was looking for more information on this subject on the internet, I came across one more interesting keyboard option that’s available on the iPad … you can split the keyboard on your screen to make it more comfortable to use! There’s two ways to make this happen:

Tap the keyboard key on the far right of the keyboard and tap “Split.” 
OR 
Use your two hands and drag the keyboard left and right.

Like magic you have part of the keyboard on the left and part on the right. To get the two parts back together again repeat the actions with the keyboard key or drag the two parts together.


Now here’s the really crazy thing about the split keyboard … there are keys available even if you can’t see them! There is one extra key on the inside of each row both left and right that you can use if you remember they are there. See the picture below, it’s easier than trying to describe this phenomenon. 


I discovered this tip while working on my second book 100 MORE Amazing Computer Tips. This second book will have lots of iPad, Gmail and Windows 8 tips along with general computer advice. While waiting for it to arrive at Amazon, why don't you buy my current book, 100 Amazing Computer Tips. It's available at Amazon.com as well as Barnes & Noble in both print ($14.99) and ebook ($7.99) versions. There's also a handy link on the top right side of this window for your shopping convenience.


If you have already bought a copy of my book, THANK YOU! I hope you would consider writing a review on Amazon.com.


Happy computing!

Diane

Don't forget to click the Subscribe to 100 Computer Tips in 100 Days via email link on the right side of the screen so you get email alerts when I add a new post.

Wednesday, July 9, 2014

Amazing Tips - Recovering Unsaved Documents

Recovering Unsaved Documents!

Microsoft has your back on this!

How many times has this happened to you, you close a program quickly and in the "do you want to save changes" dialog box you reflexively click the "Don't Save" option...and then you realize that you didn't really mean to do that! This is usually followed by a burst of expletives as you mentally kick yourself for being so stupid. Well, Microsoft has your back on this. You can recover unsaved documents for up to four days from closing them!


To recover unsaved documents:

  1. Open your program up again, if you closed it, and click on the File tab. 
  2. Click on Recent and you will see in the lower right side of the screen those wonderful words...Recover Unsaved Documents (or Workbooks or Presentations, depending on program). 
  3. Click the link and it will reveal that, unbeknownst to you, there is a folder labeled "Unsaved Files", created by your new best friends at Microsoft. Recent documents will be listed there for you to choose from. 
  4. Click on a file and click Open
  5. Now that your recovered document is open, don't forget to save your file!

Keep in mind the files in this folder are only saved for four days so don't dawdle, reopen the file quickly.

You might want to check the settings in your Office programs to see if this feature is turned on (it is by default) and adjust the AutoSave frequency. To do this:


  1. Open the Office program (Word, Excel or PowerPoint)
  2. From the File tab choose Options
  3. On the left panel choose Save
  4. Note the save documents settings and make sure that both Save AutoRecover information every XX minutes and Keep the last autosaved version if I close without saving have a check mark

The save button is still your best friend and the mantra I try to impress in my classes is to "Save Early and Often" which is still the best policy. But it's good to know you have Microsoft watching out for when you rashly close documents without saving!

Just a word about the AutoRecover setting of every 10 minutes, which is the default. If you want to minimize your exposure in case your document is unexpectedly closed, you might want to consider changing this to 5 minutes.

One more thing, you might have noticed the green arrow and box in the top picture of this post. Those are pointing to push pinned documents. For information on this great office feature see my post on this helpful topic.


Have you bought my book yet? If not, why not??  100 Amazing Computer TipsShortcuts, Tricks, and Advice to Help Everyone from Novice to Professional, is available NOW at Amazon.com and Barnes & Noble in both print ($14.99) and ebook ($7.99) formats. There's also a handy link on top right side of this window for your shopping convenience. If you've bought my book, THANK YOU! Please consider writing a review on Amazon.com.

Happy computing!

Diane

Don't forget to click the Subscribe to 100 Computer Tips in 100 Days via email link on the right side of the screen so you get email alerts when I add a new post.

Monday, June 30, 2014

Amazing Tips - The Art of Hovering

The Art of Hovering

Getting more from your software

I am frequently asked how I learn new software and keep current with new releases. The primary approach I use is to hover.

According to Merriam Webster, there are many uses for the word hover including:
  • to float in the air without moving in any direction
  • to stay very close to a person or place
  • to stay near a specified point or level
When learning new software I am referring to the third use of hovering. I move slowly across any toolbars that are available, pausing at each item. As I do so a balloon label generally appears giving me some insight into the use of the tool. This is quite helpful because it is not uncommon that the icons defy deciphering and the balloon label is of limited help. At least at that point I can go to a browser and search for more information about the tool since I now know what it's called.

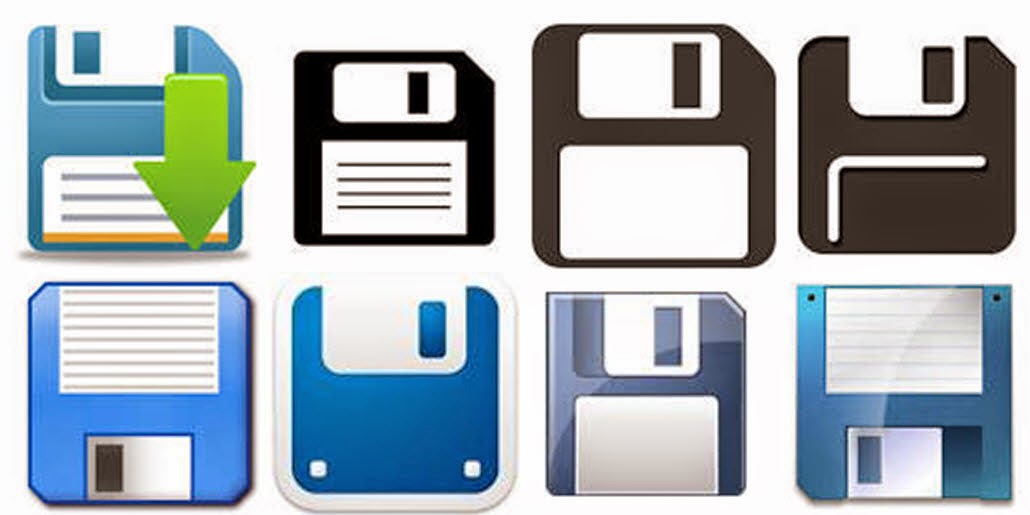
I think it's generational but, the graphic designers who come up with the size/shape/color of the tools often have different perspective than I do and different from the people I work with. In the early days of computers, the designers came up with the blue floppy disk to represent "Save". Twenty five years later I'm still pointing it out to people and explaining that it is the tool to use to save their work. The response I get is predictable. I hear everything from, "I thought it was a 50's TV set", to "What's a floppy disk." I used to carry a floppy in my bag to demonstrate the likeness to the save button but, without a machine to read them, my floppies didn't survive the last move.

One of my favorite discoveries that I found using the hover technique was to locate the "missing" dialog boxes I had become accustomed to using in Microsoft Office programs. When Microsoft did away with menus with the 2007 version of the office suite, I could no longer go to the Format menu to format text and paragraphs...not until I hovered and discovered the "Show dialog box" option on the ribbon. Now when I want to use advanced features in Word, features that the engineers didn't include on the ribbons, all I have to do is click the Show dialog box option.

Write a comment about a tool you learned about when you were hovering.


Have you bought my book yet? If not, why not??  100 Amazing Computer Tips - Shortcuts, Tricks, and Advice to Help Everyone from Novice to Professional, is available NOW at Amazon.com and Barnes & Noble in both print ($14.99) and ebook ($7.99) formats. There's also a handy link on top right side of this window for your shopping convenience. If you've bought my book, THANK YOU! Please consider writing a review on Amazon.com.

Happy computing!

Diane

Don't forget to click the Subscribe to 100 Computer Tips in 100 Days via email link on the right side of the screen so you get email alerts when I add a new post.

Friday, June 6, 2014

Groups on the iPad

Groups on the iPad
Creating groups for emailing

Here's a tip that's only for my Apple iPad friends...I know you don't always feel the love from me.

I was working with a client today on her iPad when she asked if we could create a group to make it easier for her to send email to a distribution list. "Absolutely," I said confidently and started to look around the Contacts app. I looked and looked but didn't see how to do it. I promised her I would take the assignment as homework and let her know the answer.

Imagine my surprise when I did my research and found that you can download an app to do this or you can use the iCloud but that you can't create groups in the Contacts program on the iPad! Yikes! It seems like such a fundamental feature. Well there is a work around that does not require adding any apps or using the iCloud to your device. Here's how:

  1. Open the Contacts app
  2. Click the plus sign (+) to create a new contact
  3. In the First field put in part of the name for the group, such as "Book"
  4. In the Last field put in the second part of the group name, such as "Club"
    (alternately you can use either field for the entire group name)
  5. In the add email box enter the email addresses for each individual separated by a comma and a space. For example, mom@aol.com, dad@comcast.net, bob@snet.net
  6. Tap the Done link.
  7. When you want to address an email type the group name (in this case book club) in the To: Cc: or Bcc: box and send as usual.
  8. That's it! Nice job!
Apparently Apple has no plans to add this feature to the Contacts app and is suggesting that you move to the iCloud where it is possible to create groups. If you're not comfortable with the iCloud, at lease you know there is a workable solution to your problem.


My book, 100 Amazing Computer Tips - Shortcuts, Tricks, and Advice to Help Everyone from Novice to Professional, is available NOW at Amazon.com and Barnes & Noble in both print ($14.99) and ebook ($7.99) formats. There's also a handy link on top right side of this window for your shopping convenience..

Happy computing!

Diane


Don't forget to click the Subscribe to 100 Computer Tips in 100 Days via email link on the right side of the screen so you get email alerts when Diane adds a new post.

Friday, May 30, 2014

Amazing Tips - More FREE Fonts

More FREE Fonts

More Sites to get Great FREE Fonts for Downloading


When I recently posted about Google's great free fonts, the page hits went through the roof. Clearly fonts, especially free fonts, are a popular subject. Since my initial post I became aware of a few more sites you might want to visit.

Once you find a new font they are easy to install. Here's how to do it.

  1. Click the download option.
  2. When the file finishes downloading, open the file. The files will be zipped (.zip) or compressed files. 
  3. When you open the zip file you will see a file with the font name. This will either be a TrueType or OpenType file type. Double click on the font file.
  4. Click the Install button.

That's it! The next time you go into any of your programs you will see the new font(s) in the font list!

Directions for installing the fonts is at the end of this post.

FontSquirrel
FontSquirrel font filters.
According to the FontSquirrel website, "Free fonts have met their match. We know how hard it is to find quality freeware that is licensed for commercial work. We've done the hard work, hand-selecting these typefaces and presenting them in an easy-to-use format." They have hundreds of fonts available for download. Click the filter options on the right side of the screen to limit your search. The fonts are "100% free for Commercial Use". This is important because it means you can use it in your newsletters, books and other commercial endeavors. 

DaFont
It's not very clear on DaFont if the fonts are really free or not or if they're appropriate for commercial use. They say: "The fonts presented on this website are their authors' property, and are either freeware, shareware, demo versions or public domain. The license mentioned above the download button is just an indication. Please look at the readme-files in the archives or check the indicated author's website for details, and contact him if in doubt. 
If no author/license is indicated that's because we don't have information, that doesn't mean it's free.”

Each download contains a readme file that you need to check out before you use their fonts in commercial documents.

FontSpace
FontSpace claims that they have over 23,532 fonts that are all free and have been "shared by designers around the world." With that many fonts available, you should find just the perfect characters for your next flyer/invitation/newsletter/website or to just write a memorable letter to the power company.
These may not look like fonts but they are! These are all example of "dingbat" fonts. Of course you wouldn't write a letter in dingbats but they can be very useful nonetheless. 
Also available from FontSpace are fonts that result in decorative lines. These lines can then be used on wedding invitations, brochures, newsletters or anywhere else you want to add an attractive divider. Here's an example of some of the types of "lines" you can create using the Foglihten Deco font. Pretty cool, right? You can see that the three wavy lines are created from the same letter, the number 1, combined with other letters. The results are endless.


My biggest problem was choosing which fonts to install, I felt like the proverbial kid in a candy shop. Enjoy your new fonts!

My book, 100 Amazing Computer Tips - Shortcuts, Tricks, and Advice to Help Everyone from Novice to Professional, is available NOW at Amazon.com and Barnes & Noble in both print ($14.99) and ebook ($7.99) formats. There's also a handy link on top right side of this window for your shopping convenience..

Happy computing!

Diane


Don't forget to click the Subscribe to 100 Computer Tips in 100 Days via email link on the right side of the screen so you get email alerts when Diane adds a new post.

Monday, May 19, 2014

Amazing Tip - Personalizing Bullets

Personalizing Bullets - The safe kind!

Bullets in Word, PowerPoint and Publisher

Bullets in documents have been around for a long time. I remember using them on typewritten documents but in those days the characters used for bullets were very limited. Typically you would type an asterisk (now called a star), a plus, a dash or the lower case "o". I once had a boss who liked the look of a filled in o, the one that we have become familiar with since the advent of word processors, but to achieve that look I had to take a black pen and fill the o's in by hand and then photo copy the document. Yeah, he was one of my favorite bosses!

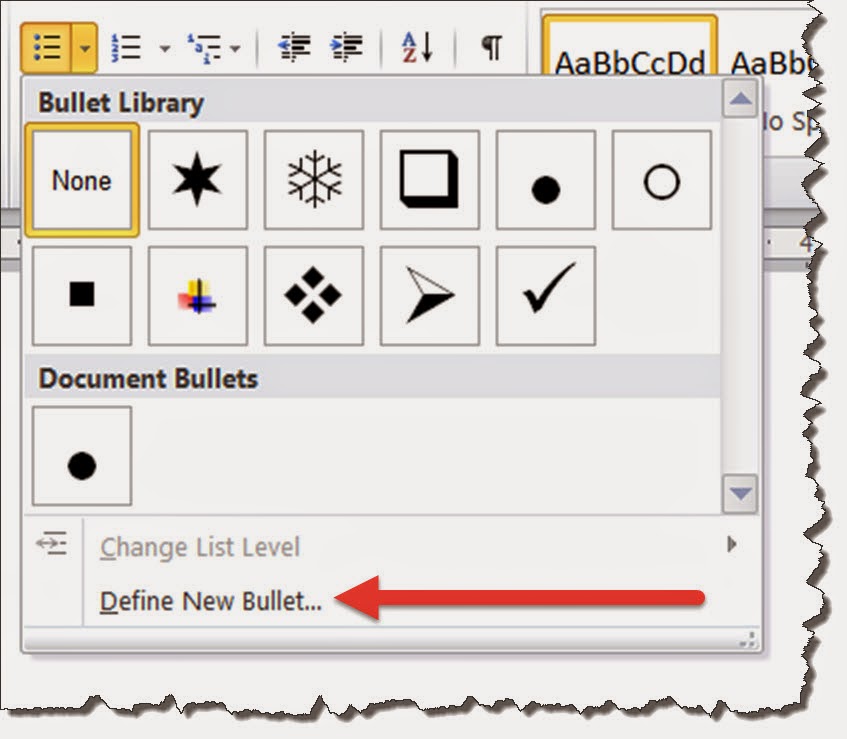
Today we use bullets all the time in Word, PowerPoint and Publisher documents (as well as other programs) and don't think much about our choices. Microsoft has given us a variety of bullets that we can select from when we click the down arrow to the right of the insert bullets command (see photo on right). They're great but suppose you wanted something special. Maybe you're a realtor and you'd like a house for a bullet or you're a painter and you'd like a paint brush, well we have those available too, you just need to click the Define New Bullet link.

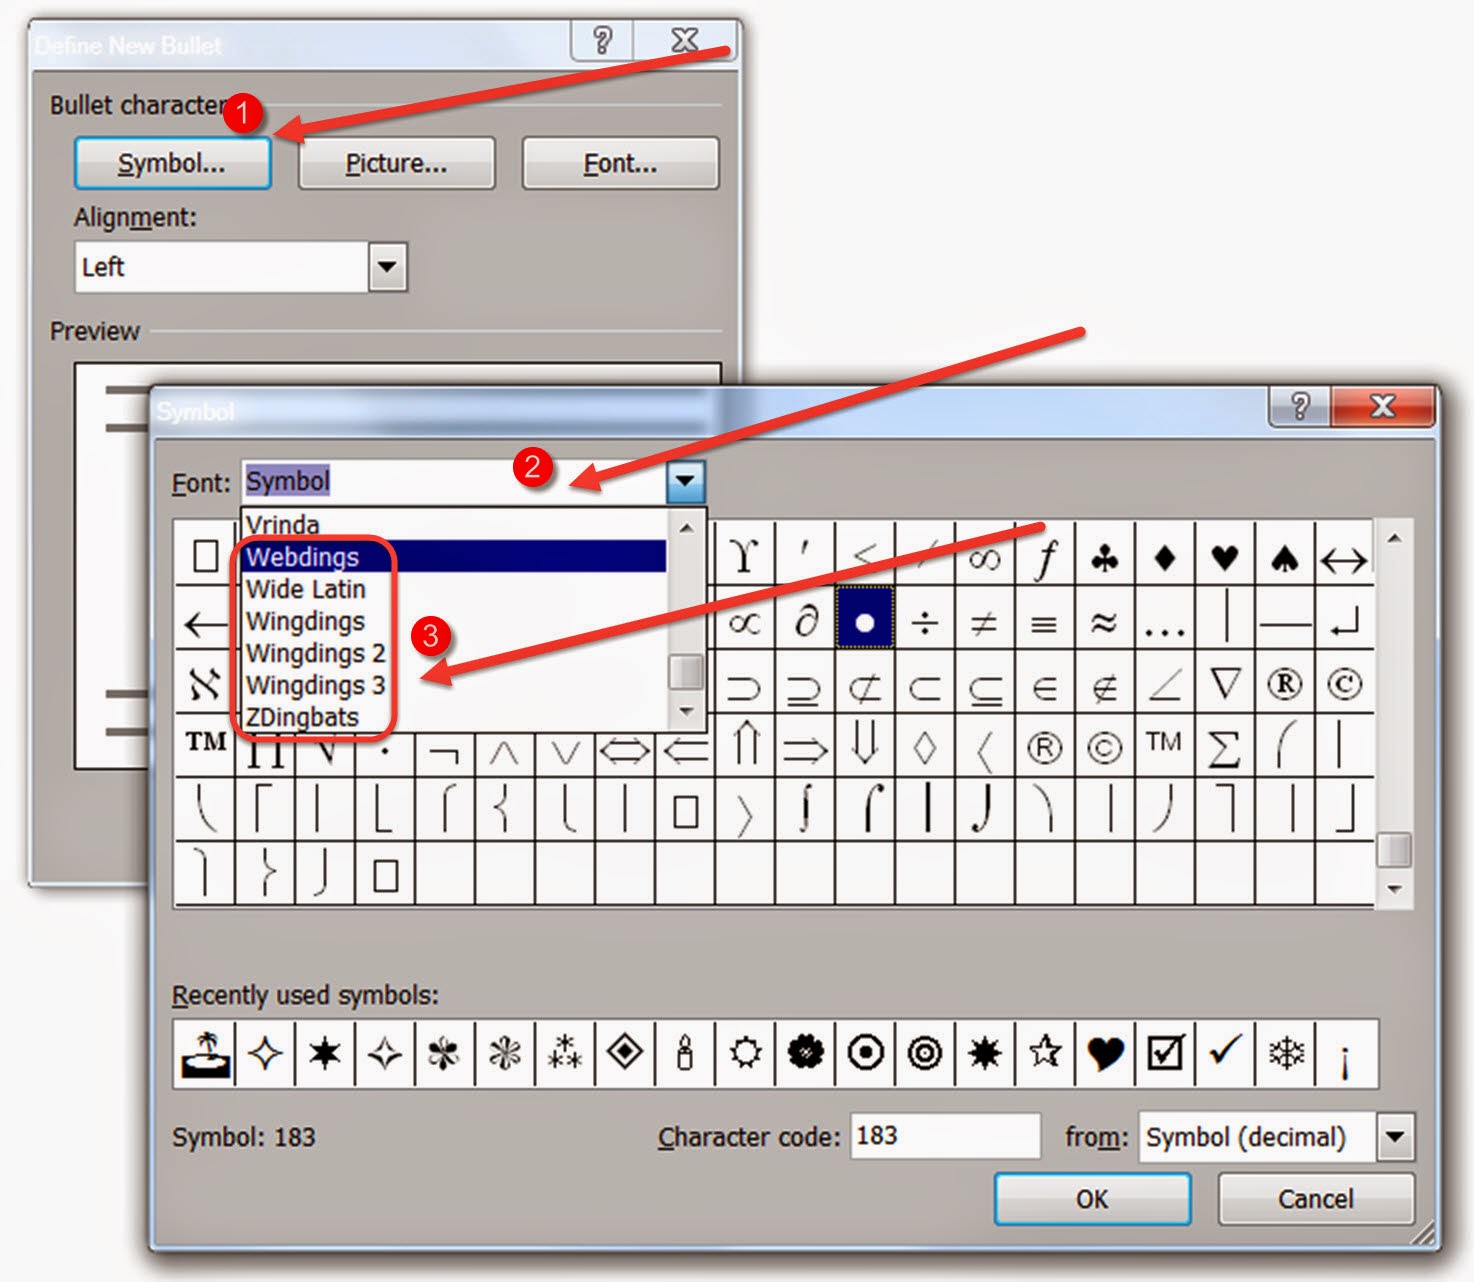
In the dialog box that appears do the following:

1. Click the Symbol option
2. Click in the font box to change the font to Webdings, Wingdings, Wingdings 2, Wingdings 3 or ZDingbats.
3. Use the preview screen to choose a cool new bullet. Don't forget to scroll up and down the preview screen, there are about 12 rows of bullets in each font.

When you've identified your new bullet click OK a few times to return to your document. There it is, your great new customized bullet! This is one of the reasons why you have fonts such as the "ding" fonts listed above. If you had explored them previously you might have wondered about their use.

If you're interested in the origin of the word dingbat as it relates to these special characters and their use in typography, there's an interesting explanation on WiseGeek.com. If you really love fonts and want to see and buy more, I suggest you go to myfonts.com. They have an amazing selection of fonts that are fairly priced. You can also do a search for "free fonts" and you'll be able to add some cool selections to your font stash. You can also subscribe to their monthly newsletter where they introduce new fonts and feature font designers. Wouldn't it be a more interesting world if we could get people to move beyond Times New Roman, Ariel and Comic San in their documents?

The pictures accompanying these directions were taken in Word 2010. The dialog boxes may differ slightly in PowerPoint and Publisher and on the Apple version of these programs, but I think you can navigate now that you know it's possible to personalize your bullets.

My book, 100 Amazing Computer Tips - Shortcuts, Tricks, and Advice to Help Everyone from Novice to Professional, is available NOW at Amazon.com and Barnes & Noble in both print and ebook formats. There's also a handy link on top right side of this window.

Happy Computing!


Diane

Don't forget to click the Subscribe to 100 Computer Tips in 100 Days via email link on the right side of the screen so you get email alerts when Diane adds a new post.

Want more tech news or interesting links? You'll get plenty of both if you keep up with Diane McKeever, the author of 100 Computer Tips in 100 Days, by subscribing to her Facebook posts or visiting her web page, www.dianemckeever.com

Monday, May 5, 2014

Amazing Tips book now available

Amazing Tips, the book, has been released!

I am pleased and excited to announce that my book, 100 Amazing Computer Tips, is finally available from Amazon in both print and ebook formats.

The book is based on the top 100 tips in this blog, which were reorganized and expanded. In addition I included printable tip cards for many of the popular software programs.

100 Amazing Computer Tips is the first in a series of Amazing Tips books that will be developed on a wide variety of subjects. I will be writing many of the computer based books but am looking for writers to author books on other topics. The Amazing Tips books could become the new Dummies series...but for smart sophisticated people like you! If you, or anyone you know, would like to be considered for the Amazing Tips series, please contact me.

You can go to Amazon.com NOW and make your choice there between the print and ebook formats. The print version is 14.99 and the downloadable ebook version is 7.99. If you've already bought a book, thank you. I hope you would consider reviewing it on Amazon for me. Your feedback is important.


Happy Computing!


Diane

Don't forget to click the Subscribe to 100 Computer Tips in 100 Days via email link on the right side of the screen so you get email alerts when Diane adds a new post.

Want more tech news or interesting links? You'll get plenty of both if you keep up with Diane McKeever, the author of 100 Computer Tips in 100 Days, by subscribing to her Facebook posts or visiting her web page, www.dianemckeever.com . 

Monday, April 21, 2014

Amazing Tip - Logging out of Gmail remotely

Logging out of Gmail remotely

Maybe you were visiting relatives and checked your email or you were traveling and used the hotel's computer. There you are in the middle of the night wondering if you just shut the browser or really logged off your Gmail account. Well worry no more. You can check if you're still logged on on elsewhere and log out from your home computer.

First you need to log into your Gmail account and scroll down, way down the screen, all the way to the bottom. On the lower right side of the screen you'll see the link for "details". Click it. A new window will appear. You can scroll through the activity log to see all of the places your Gmail account has been logged in. Use the 'Sign out all other sessions" button to do just that, log out any other sessions that you might have left open.  While you're in this screen, scroll down to the bottom and make sure that you have the Alert Settings turned on so that you will receive an alert if there is unusual activity on your account. Better safe than sorry!


My book,  100 Amazing Computer Tips, will be out shortly, maybe this week! Click the Subscribe button on the right so I can let you know when it's available for purchase.


Happy Computing!


Diane

Don't forget to click the Subscribe to 100 Computer Tips in 100 Days via email link on the right side of the screen so you get email alerts when Diane adds a new post.

Want more tech news or interesting links? You'll get plenty of both if you keep up with Diane McKeever, the writer of 100 Computer Tips in 100 Days, by subscribing to her Facebook posts or visiting her web page, www.dianemckeever.com . 


Monday, March 24, 2014

Windows 8.1 - Touch Screen Actions

Amazing Windows 8.1 Tip:

Working With a Touch Screen

Many of the directions for Windows 8.1 actions call for you to tap, pinch, slide or swipe. I thought you should see what each of these actions looks like and the result you should expect. I've also included the mouse alternative in case you don't have a touch screen.

In general, here are the mouse/touch equivalents
Mouse              Touch
Click                  Tap
Double Click      Double Tap
Right Click         Press and Hold, then release when a box appears
Drag                  Drag


Direction
Touch Action
Mouse Action
What it Does
Tap
Tap with one quick down up movement on an item. Just like striking a key on the keyboard.
Click the left mouse button once
Opens, selects, or activates whatever you tap.
Press and hold

Press your finger down and hold for about a second.
Click with the right mouse button
Shows info to help you learn more about an item or opens a menu specific to what you're doing. For example, press and hold a tile on the Start screen to rearrange, resize, or pin it. Only works for some items.
Pinch or stretch to zoom

Touch the screen or an item with two or more fingers, and then move the fingers toward each other (pinch) or away from each other (stretch).
Hold down the Ctrl key and press the + or - key
Visually zooms in or out, like with pictures or maps. A good place to explore this is the Start screen.
Slide to scroll

Drag your finger on the screen.
Just as with other windows, use the scroll bar along the bottom of the screen
Moves through what’s on the screen. Similar to scrolling with a mouse.
Slide to rearrange

Press and briefly drag an item in the direction opposite the way the page scrolls, and then move it wherever you want. (For example, if you would scroll left or right, drag the item up or down first.) When you've moved the item to the new location, let it go.
Hold down the left mouse button and drag the item.
Moves an item.
Swipe to select

Swipe an item with a short, quick movement in the direction opposite the way the page scrolls. For example:
If the page scrolls left or right, swipe the item up or down to select it.
If the page scrolls up or down, swipe the item left or right to select it.
Click once with the right mouse button
Selects an item, and often brings up app commands. A good place to explore this is in the Mail app.
Swipe or slide from the edge

Starting on the edge, either swipe your finger quickly or slide across the screen without lifting your finger.
Move to the appropriate area of the screen and hold down the left mouse button and drag in the appropriate direction. See “What it does” column for examples.
·        Open the charms (Search, Share, Start, Devices, Settings). Swipe in from the right edge.
·        Open a recently used app. Swipe in from the left edge. Keep swiping to switch between all of your recently used apps.
·        Open another app at the same time. Slide in from the left edge without lifting your finger and drag the app until a divider appears. Then move the app where you want it, and slide the divider to adjust the app size.
·        See a list of recently used apps. Slide in from the left edge without lifting your finger, and then push the app back toward the left edge.
·        Show commands for the current apps, like New and Refresh. Swipe in from the top or bottom edge.
·        Close an app. Slide down from the top edge without lifting your finger, and then drag the app to the bottom of the screen.


My book,  Amazing Windows 8.1 Tips, will be available shortly. Click the Subscribe button on the right so I can let you know when it's ready for purchase.

Happy Computing!


Diane

Don't forget to click the Subscribe to 100 Computer Tips in 100 Days via email link on the right side of the screen so you get email alerts when Diane adds a new post.

Want more tech news or interesting links? You'll get plenty of both if you keep up with Diane McKeever, the writer of 100 Computer Tips in 100 Days, by subscribing to her Facebook posts or visiting her web page, www.dianemckeever.com . 


Friday, March 21, 2014

Windows 8.1 - Customizing the Start Screen

Windows 8.1 Tip:

Customizing the Start Screen - Working With Tiles

Microsoft placed on the Start Screen all of the tiles they felt you would need, most of them tied to programs that they have a vested interest in! They created a few groups of tiles to make it easier for you to find the tile you would like to use. They made the tiles different sizes, again based on some decision by a Microsoft committee. It is very easy for you to customize the Start Screen by moving tiles around, creating your own groups and resizing the tiles.

Creating a Tile Group:
When you press and hold, either using your finger on the screen or your mouse button, you can then drag the tile to the left or right and move it to another group or create a new group of tiles. When you drag your tile to the far right, to the right of any existing groups, and release your mouse or finger, a new group is formed. Once a new group is created you can name the group by clicking in the group name box located above and to the left of the newly established group.

Rearranging Tiles in a Group:
To rearrange a tile within a group use your mouse or finger to click/press and drag the tile around. Depending on the size of the tile, other tiles within the group might also be rearranged. If you are using your finger and are having trouble accomplishing this because the page scrolls and the tile does not move, briefly drag the tile up or down before dragging left or right.

Rearranging Tile Groups:
Whole groups of tiles can be moved to the left or right. Zoom out by either pinching your fingers on the screen or using Ctrl + - (minus) on the keyboard. You will then be able to move entire groups by holding and dragging using your fingers or the mouse.

Changing the Size of a Tile:
Most tiles can be resized to four sizes, small, medium, wide and large. Not all four sizes will be available for all tiles, and I don't know why that is, but you should have at least two sizes to choose from. To resize the tiles using a mouse, right click on the tile. If you have a touch screen, press and hold for about a second. When you release you will see a series of icons along the lower left of the screen. Click the one identified as Resize and you will see the choices for that tile. Once the tile is resized, other tiles may move to compensate for the resized tile.

You can resize multiple tiles at the same time. Once you have selected one tile using the directions above, continue clicking tiles until all you want to modify are selected. Use the Resize option at the bottom to choose a size for all the selected tiles.


Adding an App Tile to the Start Screen:
Microsoft supplied you with a group of tiles that they felt you should work with. Now that you see how easily you can move them around to better suit your style, you might also be interested in adding apps that are on your computer but not part of Microsoft's scheme. First you have to find the app. You can do this by swiping Up on the Start screen with your finger or click the down arrow on the Start Screen to see more apps. When you hold your finger on an app or right click on the app, a Pin To Start option will appear along the bottom of the screen. The app will appear in one of the groups, use the techniques described above to move the app to a different group or resize the tile.


My book,  Amazing Windows 8.1 Tips, should be out shortly. Click the Subscribe button on the right so I can let you know when it's available for purchase.

Happy Computing!


Diane

Don't forget to click the Subscribe to 100 Computer Tips in 100 Days via email link on the right side of the screen so you get email alerts when Diane adds a new post.

Want more tech news or interesting links? You'll get plenty of both if you keep up with Diane McKeever, the writer of 100 Computer Tips in 100 Days, by subscribing to her Facebook posts or visiting her web page, www.dianemckeever.com . 


Named Cells and Ranger in Excel

Great Computer Tips Named Cells and Ranges in Excel Naming cells Cells already have names such as A1, B27, etc. but you can also give them n...