Monday, March 24, 2014

Windows 8.1 - Touch Screen Actions

Amazing Windows 8.1 Tip:

Working With a Touch Screen

Many of the directions for Windows 8.1 actions call for you to tap, pinch, slide or swipe. I thought you should see what each of these actions looks like and the result you should expect. I've also included the mouse alternative in case you don't have a touch screen.

In general, here are the mouse/touch equivalents
Mouse              Touch
Click                  Tap
Double Click      Double Tap
Right Click         Press and Hold, then release when a box appears
Drag                  Drag


Direction
Touch Action
Mouse Action
What it Does
Tap
Tap with one quick down up movement on an item. Just like striking a key on the keyboard.
Click the left mouse button once
Opens, selects, or activates whatever you tap.
Press and hold

Press your finger down and hold for about a second.
Click with the right mouse button
Shows info to help you learn more about an item or opens a menu specific to what you're doing. For example, press and hold a tile on the Start screen to rearrange, resize, or pin it. Only works for some items.
Pinch or stretch to zoom

Touch the screen or an item with two or more fingers, and then move the fingers toward each other (pinch) or away from each other (stretch).
Hold down the Ctrl key and press the + or - key
Visually zooms in or out, like with pictures or maps. A good place to explore this is the Start screen.
Slide to scroll

Drag your finger on the screen.
Just as with other windows, use the scroll bar along the bottom of the screen
Moves through what’s on the screen. Similar to scrolling with a mouse.
Slide to rearrange

Press and briefly drag an item in the direction opposite the way the page scrolls, and then move it wherever you want. (For example, if you would scroll left or right, drag the item up or down first.) When you've moved the item to the new location, let it go.
Hold down the left mouse button and drag the item.
Moves an item.
Swipe to select

Swipe an item with a short, quick movement in the direction opposite the way the page scrolls. For example:
If the page scrolls left or right, swipe the item up or down to select it.
If the page scrolls up or down, swipe the item left or right to select it.
Click once with the right mouse button
Selects an item, and often brings up app commands. A good place to explore this is in the Mail app.
Swipe or slide from the edge

Starting on the edge, either swipe your finger quickly or slide across the screen without lifting your finger.
Move to the appropriate area of the screen and hold down the left mouse button and drag in the appropriate direction. See “What it does” column for examples.
·        Open the charms (Search, Share, Start, Devices, Settings). Swipe in from the right edge.
·        Open a recently used app. Swipe in from the left edge. Keep swiping to switch between all of your recently used apps.
·        Open another app at the same time. Slide in from the left edge without lifting your finger and drag the app until a divider appears. Then move the app where you want it, and slide the divider to adjust the app size.
·        See a list of recently used apps. Slide in from the left edge without lifting your finger, and then push the app back toward the left edge.
·        Show commands for the current apps, like New and Refresh. Swipe in from the top or bottom edge.
·        Close an app. Slide down from the top edge without lifting your finger, and then drag the app to the bottom of the screen.


My book,  Amazing Windows 8.1 Tips, will be available shortly. Click the Subscribe button on the right so I can let you know when it's ready for purchase.

Happy Computing!


Diane

Don't forget to click the Subscribe to 100 Computer Tips in 100 Days via email link on the right side of the screen so you get email alerts when Diane adds a new post.

Want more tech news or interesting links? You'll get plenty of both if you keep up with Diane McKeever, the writer of 100 Computer Tips in 100 Days, by subscribing to her Facebook posts or visiting her web page, www.dianemckeever.com . 


Friday, March 21, 2014

Windows 8.1 - Customizing the Start Screen

Windows 8.1 Tip:

Customizing the Start Screen - Working With Tiles

Microsoft placed on the Start Screen all of the tiles they felt you would need, most of them tied to programs that they have a vested interest in! They created a few groups of tiles to make it easier for you to find the tile you would like to use. They made the tiles different sizes, again based on some decision by a Microsoft committee. It is very easy for you to customize the Start Screen by moving tiles around, creating your own groups and resizing the tiles.

Creating a Tile Group:
When you press and hold, either using your finger on the screen or your mouse button, you can then drag the tile to the left or right and move it to another group or create a new group of tiles. When you drag your tile to the far right, to the right of any existing groups, and release your mouse or finger, a new group is formed. Once a new group is created you can name the group by clicking in the group name box located above and to the left of the newly established group.

Rearranging Tiles in a Group:
To rearrange a tile within a group use your mouse or finger to click/press and drag the tile around. Depending on the size of the tile, other tiles within the group might also be rearranged. If you are using your finger and are having trouble accomplishing this because the page scrolls and the tile does not move, briefly drag the tile up or down before dragging left or right.

Rearranging Tile Groups:
Whole groups of tiles can be moved to the left or right. Zoom out by either pinching your fingers on the screen or using Ctrl + - (minus) on the keyboard. You will then be able to move entire groups by holding and dragging using your fingers or the mouse.

Changing the Size of a Tile:
Most tiles can be resized to four sizes, small, medium, wide and large. Not all four sizes will be available for all tiles, and I don't know why that is, but you should have at least two sizes to choose from. To resize the tiles using a mouse, right click on the tile. If you have a touch screen, press and hold for about a second. When you release you will see a series of icons along the lower left of the screen. Click the one identified as Resize and you will see the choices for that tile. Once the tile is resized, other tiles may move to compensate for the resized tile.

You can resize multiple tiles at the same time. Once you have selected one tile using the directions above, continue clicking tiles until all you want to modify are selected. Use the Resize option at the bottom to choose a size for all the selected tiles.


Adding an App Tile to the Start Screen:
Microsoft supplied you with a group of tiles that they felt you should work with. Now that you see how easily you can move them around to better suit your style, you might also be interested in adding apps that are on your computer but not part of Microsoft's scheme. First you have to find the app. You can do this by swiping Up on the Start screen with your finger or click the down arrow on the Start Screen to see more apps. When you hold your finger on an app or right click on the app, a Pin To Start option will appear along the bottom of the screen. The app will appear in one of the groups, use the techniques described above to move the app to a different group or resize the tile.


My book,  Amazing Windows 8.1 Tips, should be out shortly. Click the Subscribe button on the right so I can let you know when it's available for purchase.

Happy Computing!


Diane

Don't forget to click the Subscribe to 100 Computer Tips in 100 Days via email link on the right side of the screen so you get email alerts when Diane adds a new post.

Want more tech news or interesting links? You'll get plenty of both if you keep up with Diane McKeever, the writer of 100 Computer Tips in 100 Days, by subscribing to her Facebook posts or visiting her web page, www.dianemckeever.com . 


Monday, March 3, 2014

Windows 8 Keyboard Shortcuts

Windows 8 Keyboard Shortcuts

So, have you learned to love Windows 8 yet? Maybe yes, maybe no, but here are some keyboard shortcuts that you might like to include in your use of it. Don't forget the Windows key has the little windows flag on it.

Keyboard Shortcut
Action
Windows key
Go to the Start screen or toggle between the Start screen and your previous location
Windows-C
Open the Charms bar
Windows-D
Show the Desktop
Windows-E
Open File Explorer
Windows-F
Go to Files in the Search charm
Windows-H
Go to the Share charm
Windows-I
Go to the Settings charm
Windows-K
Go to the Devices charm
Windows-L
Lock the computer
Windows-M
Minimize all windows (only on the Desktop)
Windows-O
Lock/Unlock the screen orientation
Windows-Q
Go to Apps in the Search charm
Windows-R
Launch the Run box
Windows-T
Put the focus on the taskbar and cycle through your running Desktop apps
Windows-U
Open the Ease of Access Center
Windows-V
Cycle through your notifications
Windows-W
Go to Settings in the Search charm
Windows-X
Open a menu of tools for power users
Windows-Z
Launch the App bar (or make it disappear if it's already showing)
Windows-1 through 9
Go to the app in the corresponding position on the taskbar (Desktop only)
Windows-, (comma)
Peek at the Desktop (on Desktop only)
Windows-spacebar
Switch the input language and keyboard layout (launch Narrator)
Windows-Home
Minimize non-active Desktop apps
Windows-Page Up
Move Start screen to left monitor
Windows-Page Down
Move Start screen to right monitor
Windows-up arrow
Maximize a Desktop app
Windows-down arrow
Restore/minimize a Desktop app
Windows-F1
Run Windows Help and Support
Windows + +
Launch Magnifier and zoom in
Windows + -
Zoom out
Windows + Tab
Switch between running apps

My book, 100 Amazing Computer Tips, should be out in a shortly. Click the Subscribe button on the right so I can let you know when it's available for purchase.

Happy Computing!


Diane

Don't forget to click the Subscribe to 100 Computer Tips in 100 Days via email link on the right side of the screen so you get email alerts when Diane adds a new post.

Want more tech news or interesting links? You'll get plenty of both if you keep up with Diane McKeever, the writer of 100 Computer Tips in 100 Days, by subscribing to her Facebook posts or visiting her web page, www.dianemckeever.com . 


Monday, January 27, 2014

Tip #121 Finding Files

100 (or more) Computer Tips in 100 (or more) Days

Tip #121 - Finding Files

Some of my best tips come from working with my husband. He's my typical client, someone who uses the computer every day but never got the basics down. He was struggling to find a document from four years ago that he was sure he had saved...but where...that was the question.

In both the Apple and PC environment there is a fabulous search feature right in the folder window. If you think you saved a document in the documents folder then navigate to that folder first before you perform your search. My husband was not sure where he might have put the folder so we went to the Libraries folder which allowed us to search just about everywhere someone would save a document. In the Apple environment navigate to the Finder.

In the Search box type in the word(s) you think were in the file, not necessarily in the file name but words that might have been used in the file. Yes, you see that the search is not just for file names but the CONTENTS of the file are returned too. You should try to come up with a unique term to search for or you will get too many results. Once we put in the unique word we found the document lickety split.


My second book, Excel's Amazing Pivot Tables, should be out in a few months. Click the Subscribe button on the right so I can let you know when it's available for purchase.

Happy Computing!


Diane

Don't forget to click the Subscribe to 100 Computer Tips in 100 Days via email link on the right side of the screen so you get email alerts when Diane adds a new post.

Want more tech news or interesting links? You'll get plenty of both if you keep up with Diane McKeever, the writer of 100 Computer Tips in 100 Days, by subscribing to her Facebook posts or visiting her web page, www.dianemckeever.com . 


Monday, January 20, 2014

Tip #120 - Opening and Attaching Files

100 (or more) Computer Tips in 100 (or more) Days

Tip #120 - Opening & Attaching Files

If you use your computer as much as I do you probably spend a good part of your day creating and saving documents that need to be attached up uploaded. If you are in any Microsoft Office program you can do this easily by clicking on the Email button you added to the Quick Access Toolbar (click to view that tip) or by going to the File menu and choosing Save & Send (see the 4 steps in the figure below).


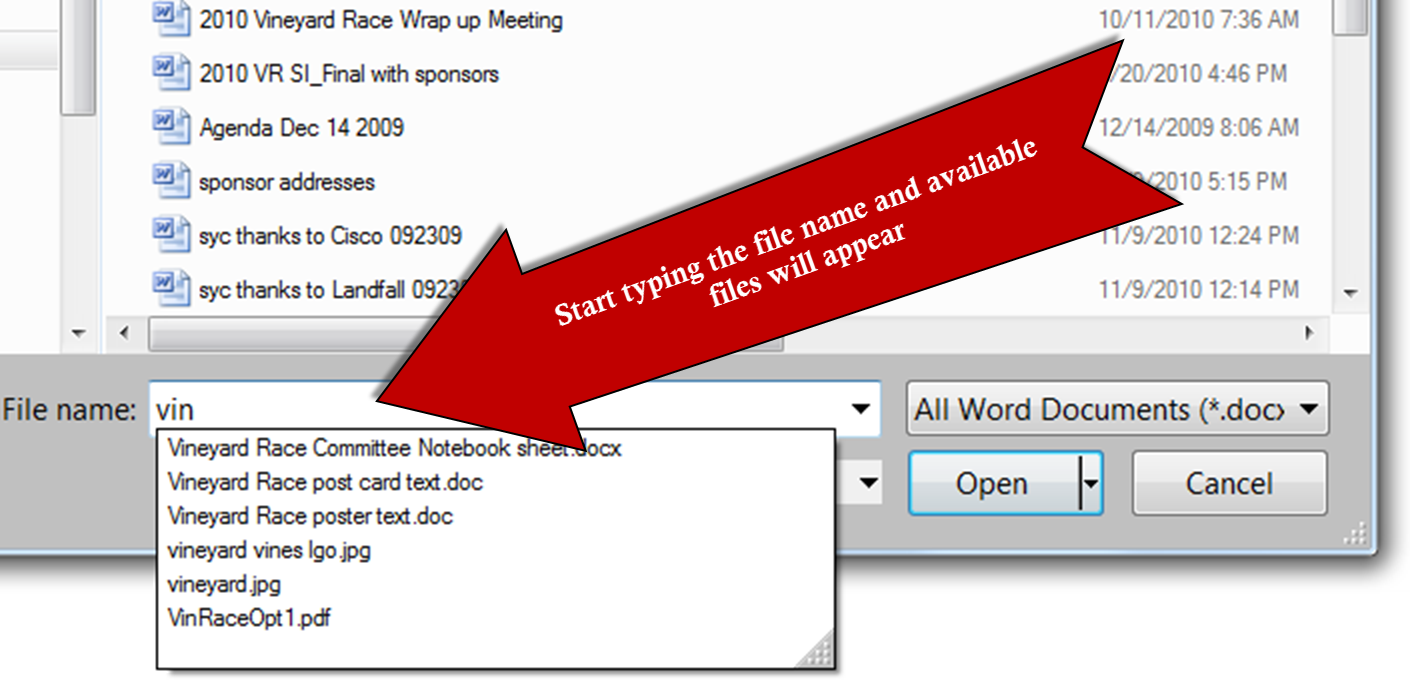
Did you also know that when you open the attach dialog box and navigate to the folder that contains the file, you can begin to type in the name of the document you want to attach in the File Name box. This is really helpful when you have a folder with lots of files in it. Give it a try the next time you need to open or attach a file.


My second book, Excel's Amazing Pivot Tables, should be out in a few months. Click the Subscribe button on the right so I can let you know when it's available for purchase.

Happy Computing!


Diane

Don't forget to click the Subscribe to 100 Computer Tips in 100 Days via email link on the right side of the screen so you get email alerts when Diane adds a new post.

Want more tech news or interesting links? You'll get plenty of both if you keep up with Diane McKeever, the writer of 100 Computer Tips in 100 Days, by subscribing to her Facebook posts or visiting her web page, www.dianemckeever.com . 


Monday, November 25, 2013

Tip #116 - Spell-Checking in Your Browser

100 (or more) Computer Tips in 100 (or more) Days

Tip #116 - Spell-Checking in Your Browser

When you're filling in information using your browser, there is a spell check option that's available to help you. I noticed that when posting on Facebook or creating an email in my Gmail account, a red squiggly underline would appear below words that were not in the dictionary. This gave me a great sense of comfort
because I am not the best speller in the world. I got comfortable giving the word my best shot and the program would let me know if I was right or wrong. And then one day my lovely red squiggles stopped appearing. I knew that I hadn't suddenly learned how to spell so I figured out that somehow my spell checking tool got turned off...but where was the tool and how do I get it back on!

My initial thought was that the spell check option was in Gmail or Facebook but I couldn't find any documentation to support that. Then I remembered I had been having trouble with my Chrome browser and maybe that was the source of my problem...and it was. If you're not seeing the red squiggles when you're entering text in a multi-line text box...on any website...find the directions for your browser below and make sure your spell check is turned on. This is helpful not only for your email but it will help on websites such as Amazon, TripAdvisor or Yelp when you're writing reviews.

One more thing, when you see a squiggly red line, move your mouse on it and click with your right mouse button (Ctrl click in the Apple environment). A menu of choices will pop up including some suggestions for the correct spelling of the word. You might also consider using "Add to dictionary" for words that are spelled correctly but are not in the dictionary. If you do that you never see the squiggly line under that word again.

Here's the directions for four of the top browsers:

Google Chrome

Mozilla Firefox

Internet Explorer

Safari

I thought I would share an interesting observation with you about my blog. Twice as many people visit my blog using Chrome browser than the Internet Explorer, which is the second most used browser for visitors. It shows that I have very smart visitors.

Please share this tip with your spelling challenged friends, you'll be glad you did.

Happy Computing!

Diane

Don't forget to click the Subscribe to 100 Computer Tips in 100 Days via email link on the right side of the screen so you get email alerts when Diane adds a new post.

Want more tech news or interesting links? You'll get plenty of both if you keep up with Diane McKeever, the writer of 100 Computer Tips in 100 Days, by subscribing to her Facebook posts or visiting her web page, www.dianemckeever.com . 

Thursday, November 21, 2013

Tip #115 - Changing Your Orientation (in Word)

100 (or more) Computer Tips in 100 (or more) Days

Tip #115 - Changing Your Orientation (in Word)

Suppose you need to have some charts in your document and they need to be on landscape pages but the rest of your document is in portrait orientation. What are your options? I was working on a document in Microsoft Word like this recently and I wanted to insert a landscape page in the middle of a Word document, between two portrait pages. Of course some creative folks would just put the graphic in sideways since it prints out the same, but because more documents are being read on-line rather than being printed (right??) I wanted to make it easy to read. I didn't want to have to imagine the readers tilting their head to the left/right to view the chart.


Pages in Word document with different orientations.

Back "in the day" we would create two documents when we needed pages with different orientations, one for all of the portrait pages and the other for the landscape. It was challenging keeping the page numbers sorted out in these two documents but we didn't see any other alternative.  I don't remember exactly which version of Microsoft Word introduced the feature that allows for multiple page orientations but I believe it was either in 98 or 2000. The secret to making it work is Section Breaks!

For those of you who use the very popular press the Return/Enter key until you're on a new page method of pagination, it might come as a surprise that not only can you insert page breaks but you can insert section breaks in a word document. There are many reasons for section breaks but we'll only talk about their need when changing the page orientation.

To change the orientation of a page:
  • Click in the document where you would like to insert the landscape page.
  • From the Page Layout tab, Page Setup group click the Breaks option.
  • From the Breaks list choose Section Breaks - Next Page.
  • Without moving your cursor choose Orientation - Landscape from the same area of the ribbon (Page Layout tab, Page Setup group).
  • The page that your cursor is on will now become a landscape page...and all of the pages following it (the current section) will also become landscape.
  • When you want to return to portrait orientation, insert another Section Break - Next Page and choose Orientation - Portrait.
You'll have to use the same steps to return to a portrait orientation if you don't want the rest of your document in landscape.

While you're looking at the types of Breaks available in Word. People mostly using either Page breaks or Section Breaks - Next Page. Note: You can insert a page break from your Keyboard using the Ctrl (Command) + Enter/Return keys. 

Promise me you'll insert page breaks rather than pressing the Enter/Return key until a new page appears. 

Happy Computing!

Diane

Don't forget to click the Subscribe to 100 Computer Tips in 100 Days via email link on the right side of the screen so you get email alerts when Diane adds a new post.

Want more tech news or interesting links? You'll get plenty of both if you keep up with Diane McKeever, the writer of 100 Computer Tips in 100 Days, by subscribing to her Facebook posts or visiting her web page, www.dianemckeever.com . 
Named Cells and Ranger in Excel

Great Computer Tips Named Cells and Ranges in Excel Naming cells Cells already have names such as A1, B27, etc. but you can also give them n...