Monday, June 30, 2014

Amazing Tips - The Art of Hovering

The Art of Hovering

Getting more from your software

I am frequently asked how I learn new software and keep current with new releases. The primary approach I use is to hover.

According to Merriam Webster, there are many uses for the word hover including:
  • to float in the air without moving in any direction
  • to stay very close to a person or place
  • to stay near a specified point or level
When learning new software I am referring to the third use of hovering. I move slowly across any toolbars that are available, pausing at each item. As I do so a balloon label generally appears giving me some insight into the use of the tool. This is quite helpful because it is not uncommon that the icons defy deciphering and the balloon label is of limited help. At least at that point I can go to a browser and search for more information about the tool since I now know what it's called.

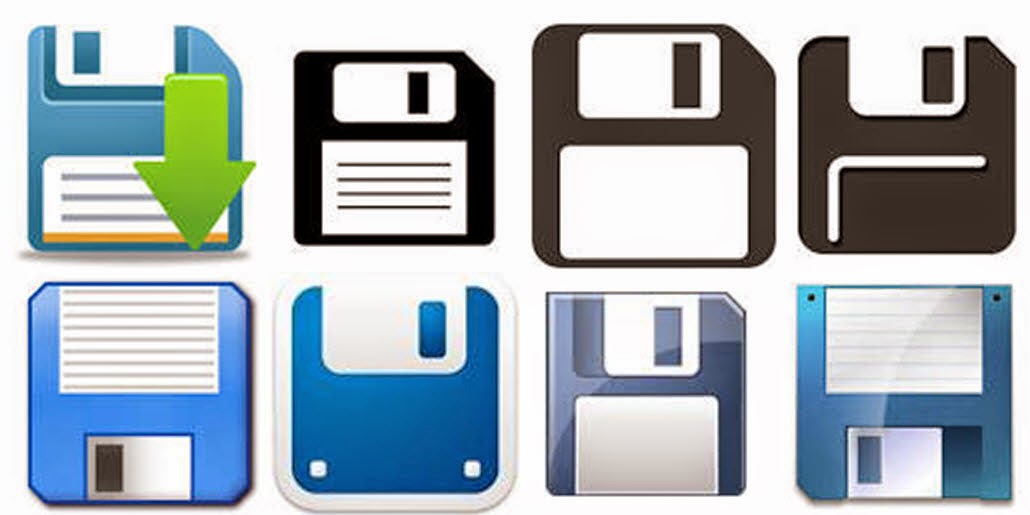
I think it's generational but, the graphic designers who come up with the size/shape/color of the tools often have different perspective than I do and different from the people I work with. In the early days of computers, the designers came up with the blue floppy disk to represent "Save". Twenty five years later I'm still pointing it out to people and explaining that it is the tool to use to save their work. The response I get is predictable. I hear everything from, "I thought it was a 50's TV set", to "What's a floppy disk." I used to carry a floppy in my bag to demonstrate the likeness to the save button but, without a machine to read them, my floppies didn't survive the last move.

One of my favorite discoveries that I found using the hover technique was to locate the "missing" dialog boxes I had become accustomed to using in Microsoft Office programs. When Microsoft did away with menus with the 2007 version of the office suite, I could no longer go to the Format menu to format text and paragraphs...not until I hovered and discovered the "Show dialog box" option on the ribbon. Now when I want to use advanced features in Word, features that the engineers didn't include on the ribbons, all I have to do is click the Show dialog box option.

Write a comment about a tool you learned about when you were hovering.


Have you bought my book yet? If not, why not??  100 Amazing Computer Tips - Shortcuts, Tricks, and Advice to Help Everyone from Novice to Professional, is available NOW at Amazon.com and Barnes & Noble in both print ($14.99) and ebook ($7.99) formats. There's also a handy link on top right side of this window for your shopping convenience. If you've bought my book, THANK YOU! Please consider writing a review on Amazon.com.

Happy computing!

Diane

Don't forget to click the Subscribe to 100 Computer Tips in 100 Days via email link on the right side of the screen so you get email alerts when I add a new post.

Friday, June 6, 2014

Groups on the iPad

Groups on the iPad
Creating groups for emailing

Here's a tip that's only for my Apple iPad friends...I know you don't always feel the love from me.

I was working with a client today on her iPad when she asked if we could create a group to make it easier for her to send email to a distribution list. "Absolutely," I said confidently and started to look around the Contacts app. I looked and looked but didn't see how to do it. I promised her I would take the assignment as homework and let her know the answer.

Imagine my surprise when I did my research and found that you can download an app to do this or you can use the iCloud but that you can't create groups in the Contacts program on the iPad! Yikes! It seems like such a fundamental feature. Well there is a work around that does not require adding any apps or using the iCloud to your device. Here's how:

  1. Open the Contacts app
  2. Click the plus sign (+) to create a new contact
  3. In the First field put in part of the name for the group, such as "Book"
  4. In the Last field put in the second part of the group name, such as "Club"
    (alternately you can use either field for the entire group name)
  5. In the add email box enter the email addresses for each individual separated by a comma and a space. For example, mom@aol.com, dad@comcast.net, bob@snet.net
  6. Tap the Done link.
  7. When you want to address an email type the group name (in this case book club) in the To: Cc: or Bcc: box and send as usual.
  8. That's it! Nice job!
Apparently Apple has no plans to add this feature to the Contacts app and is suggesting that you move to the iCloud where it is possible to create groups. If you're not comfortable with the iCloud, at lease you know there is a workable solution to your problem.


My book, 100 Amazing Computer Tips - Shortcuts, Tricks, and Advice to Help Everyone from Novice to Professional, is available NOW at Amazon.com and Barnes & Noble in both print ($14.99) and ebook ($7.99) formats. There's also a handy link on top right side of this window for your shopping convenience..

Happy computing!

Diane


Don't forget to click the Subscribe to 100 Computer Tips in 100 Days via email link on the right side of the screen so you get email alerts when Diane adds a new post.

Friday, May 30, 2014

Amazing Tips - More FREE Fonts

More FREE Fonts

More Sites to get Great FREE Fonts for Downloading


When I recently posted about Google's great free fonts, the page hits went through the roof. Clearly fonts, especially free fonts, are a popular subject. Since my initial post I became aware of a few more sites you might want to visit.

Once you find a new font they are easy to install. Here's how to do it.

  1. Click the download option.
  2. When the file finishes downloading, open the file. The files will be zipped (.zip) or compressed files. 
  3. When you open the zip file you will see a file with the font name. This will either be a TrueType or OpenType file type. Double click on the font file.
  4. Click the Install button.

That's it! The next time you go into any of your programs you will see the new font(s) in the font list!

Directions for installing the fonts is at the end of this post.

FontSquirrel
FontSquirrel font filters.
According to the FontSquirrel website, "Free fonts have met their match. We know how hard it is to find quality freeware that is licensed for commercial work. We've done the hard work, hand-selecting these typefaces and presenting them in an easy-to-use format." They have hundreds of fonts available for download. Click the filter options on the right side of the screen to limit your search. The fonts are "100% free for Commercial Use". This is important because it means you can use it in your newsletters, books and other commercial endeavors. 

DaFont
It's not very clear on DaFont if the fonts are really free or not or if they're appropriate for commercial use. They say: "The fonts presented on this website are their authors' property, and are either freeware, shareware, demo versions or public domain. The license mentioned above the download button is just an indication. Please look at the readme-files in the archives or check the indicated author's website for details, and contact him if in doubt. 
If no author/license is indicated that's because we don't have information, that doesn't mean it's free.”

Each download contains a readme file that you need to check out before you use their fonts in commercial documents.

FontSpace
FontSpace claims that they have over 23,532 fonts that are all free and have been "shared by designers around the world." With that many fonts available, you should find just the perfect characters for your next flyer/invitation/newsletter/website or to just write a memorable letter to the power company.
These may not look like fonts but they are! These are all example of "dingbat" fonts. Of course you wouldn't write a letter in dingbats but they can be very useful nonetheless. 
Also available from FontSpace are fonts that result in decorative lines. These lines can then be used on wedding invitations, brochures, newsletters or anywhere else you want to add an attractive divider. Here's an example of some of the types of "lines" you can create using the Foglihten Deco font. Pretty cool, right? You can see that the three wavy lines are created from the same letter, the number 1, combined with other letters. The results are endless.


My biggest problem was choosing which fonts to install, I felt like the proverbial kid in a candy shop. Enjoy your new fonts!

My book, 100 Amazing Computer Tips - Shortcuts, Tricks, and Advice to Help Everyone from Novice to Professional, is available NOW at Amazon.com and Barnes & Noble in both print ($14.99) and ebook ($7.99) formats. There's also a handy link on top right side of this window for your shopping convenience..

Happy computing!

Diane


Don't forget to click the Subscribe to 100 Computer Tips in 100 Days via email link on the right side of the screen so you get email alerts when Diane adds a new post.

Monday, May 19, 2014

Amazing Tip - Personalizing Bullets

Personalizing Bullets - The safe kind!

Bullets in Word, PowerPoint and Publisher

Bullets in documents have been around for a long time. I remember using them on typewritten documents but in those days the characters used for bullets were very limited. Typically you would type an asterisk (now called a star), a plus, a dash or the lower case "o". I once had a boss who liked the look of a filled in o, the one that we have become familiar with since the advent of word processors, but to achieve that look I had to take a black pen and fill the o's in by hand and then photo copy the document. Yeah, he was one of my favorite bosses!

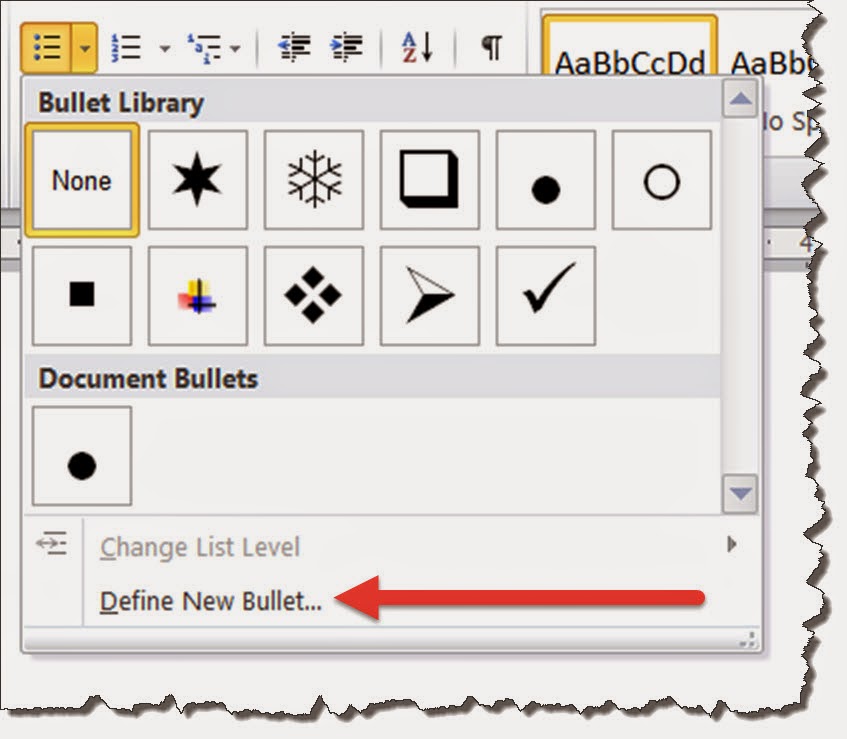
Today we use bullets all the time in Word, PowerPoint and Publisher documents (as well as other programs) and don't think much about our choices. Microsoft has given us a variety of bullets that we can select from when we click the down arrow to the right of the insert bullets command (see photo on right). They're great but suppose you wanted something special. Maybe you're a realtor and you'd like a house for a bullet or you're a painter and you'd like a paint brush, well we have those available too, you just need to click the Define New Bullet link.

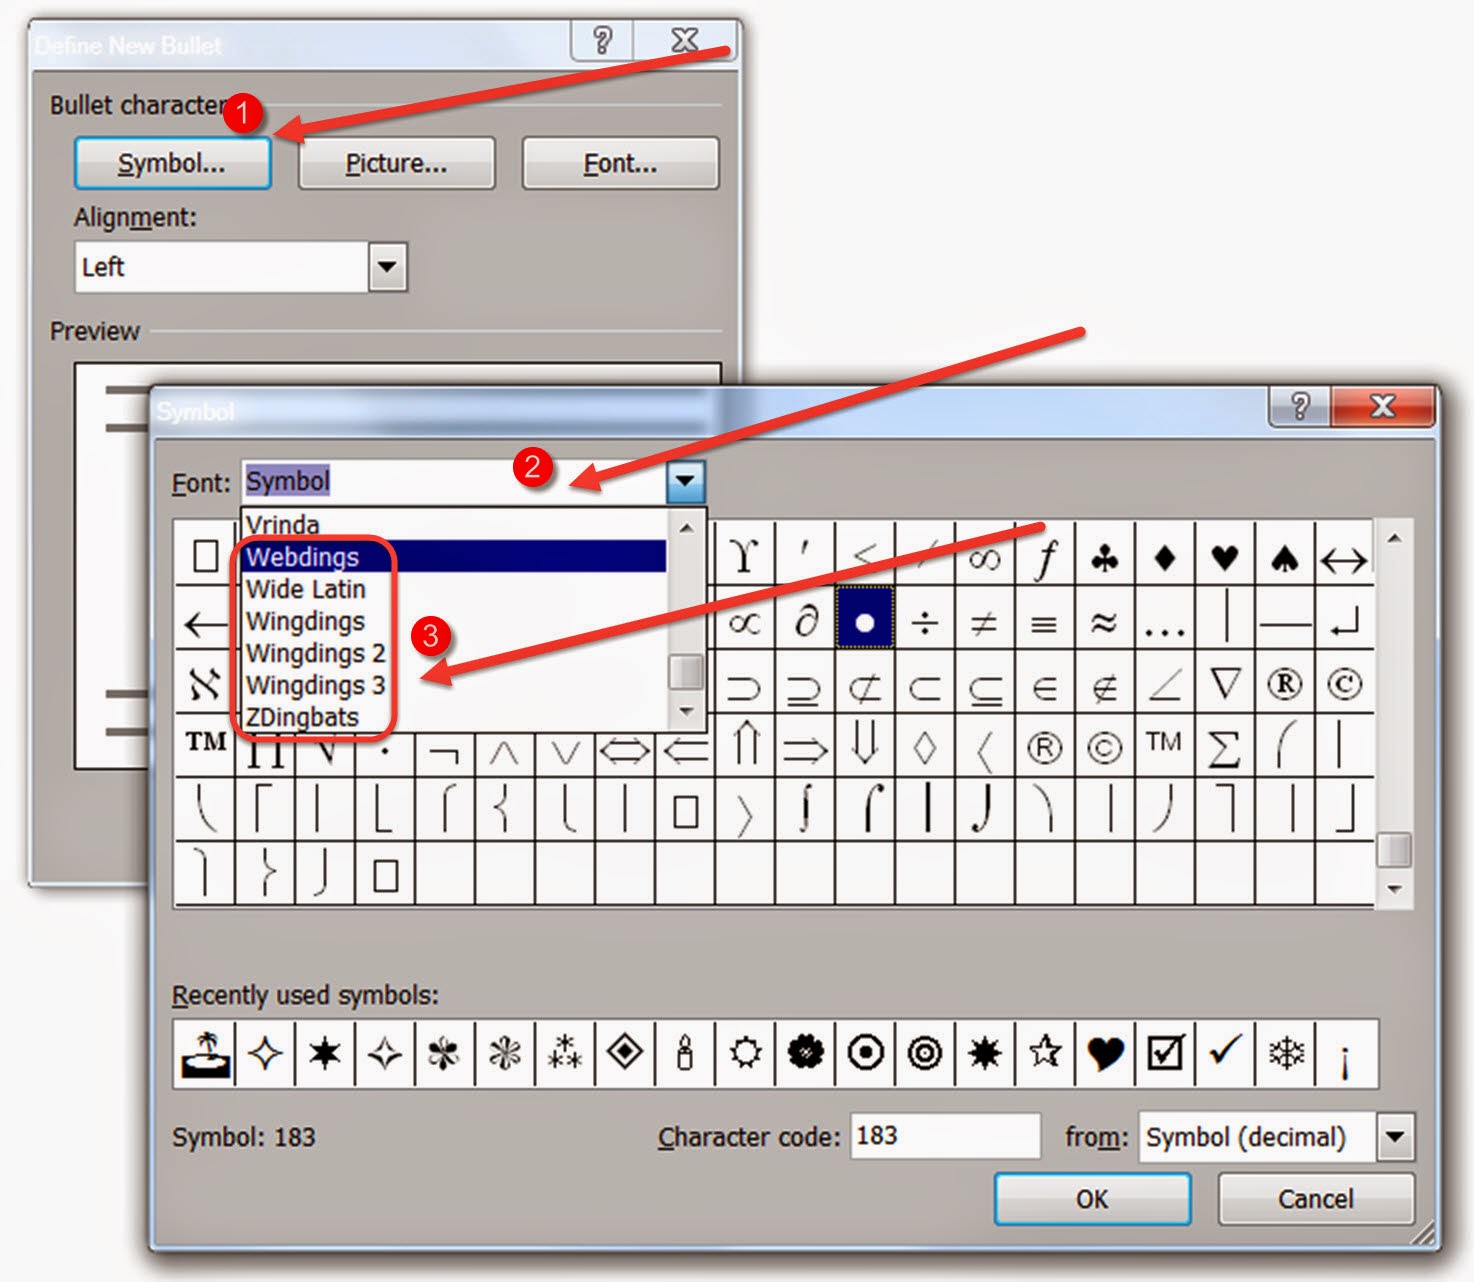
In the dialog box that appears do the following:

1. Click the Symbol option
2. Click in the font box to change the font to Webdings, Wingdings, Wingdings 2, Wingdings 3 or ZDingbats.
3. Use the preview screen to choose a cool new bullet. Don't forget to scroll up and down the preview screen, there are about 12 rows of bullets in each font.

When you've identified your new bullet click OK a few times to return to your document. There it is, your great new customized bullet! This is one of the reasons why you have fonts such as the "ding" fonts listed above. If you had explored them previously you might have wondered about their use.

If you're interested in the origin of the word dingbat as it relates to these special characters and their use in typography, there's an interesting explanation on WiseGeek.com. If you really love fonts and want to see and buy more, I suggest you go to myfonts.com. They have an amazing selection of fonts that are fairly priced. You can also do a search for "free fonts" and you'll be able to add some cool selections to your font stash. You can also subscribe to their monthly newsletter where they introduce new fonts and feature font designers. Wouldn't it be a more interesting world if we could get people to move beyond Times New Roman, Ariel and Comic San in their documents?

The pictures accompanying these directions were taken in Word 2010. The dialog boxes may differ slightly in PowerPoint and Publisher and on the Apple version of these programs, but I think you can navigate now that you know it's possible to personalize your bullets.

My book, 100 Amazing Computer Tips - Shortcuts, Tricks, and Advice to Help Everyone from Novice to Professional, is available NOW at Amazon.com and Barnes & Noble in both print and ebook formats. There's also a handy link on top right side of this window.

Happy Computing!


Diane

Don't forget to click the Subscribe to 100 Computer Tips in 100 Days via email link on the right side of the screen so you get email alerts when Diane adds a new post.

Want more tech news or interesting links? You'll get plenty of both if you keep up with Diane McKeever, the author of 100 Computer Tips in 100 Days, by subscribing to her Facebook posts or visiting her web page, www.dianemckeever.com

Monday, May 5, 2014

Amazing Tips book now available

Amazing Tips, the book, has been released!

I am pleased and excited to announce that my book, 100 Amazing Computer Tips, is finally available from Amazon in both print and ebook formats.

The book is based on the top 100 tips in this blog, which were reorganized and expanded. In addition I included printable tip cards for many of the popular software programs.

100 Amazing Computer Tips is the first in a series of Amazing Tips books that will be developed on a wide variety of subjects. I will be writing many of the computer based books but am looking for writers to author books on other topics. The Amazing Tips books could become the new Dummies series...but for smart sophisticated people like you! If you, or anyone you know, would like to be considered for the Amazing Tips series, please contact me.

You can go to Amazon.com NOW and make your choice there between the print and ebook formats. The print version is 14.99 and the downloadable ebook version is 7.99. If you've already bought a book, thank you. I hope you would consider reviewing it on Amazon for me. Your feedback is important.


Happy Computing!


Diane

Don't forget to click the Subscribe to 100 Computer Tips in 100 Days via email link on the right side of the screen so you get email alerts when Diane adds a new post.

Want more tech news or interesting links? You'll get plenty of both if you keep up with Diane McKeever, the author of 100 Computer Tips in 100 Days, by subscribing to her Facebook posts or visiting her web page, www.dianemckeever.com . 

Monday, April 21, 2014

Amazing Tip - Logging out of Gmail remotely

Logging out of Gmail remotely

Maybe you were visiting relatives and checked your email or you were traveling and used the hotel's computer. There you are in the middle of the night wondering if you just shut the browser or really logged off your Gmail account. Well worry no more. You can check if you're still logged on on elsewhere and log out from your home computer.

First you need to log into your Gmail account and scroll down, way down the screen, all the way to the bottom. On the lower right side of the screen you'll see the link for "details". Click it. A new window will appear. You can scroll through the activity log to see all of the places your Gmail account has been logged in. Use the 'Sign out all other sessions" button to do just that, log out any other sessions that you might have left open.  While you're in this screen, scroll down to the bottom and make sure that you have the Alert Settings turned on so that you will receive an alert if there is unusual activity on your account. Better safe than sorry!


My book,  100 Amazing Computer Tips, will be out shortly, maybe this week! Click the Subscribe button on the right so I can let you know when it's available for purchase.


Happy Computing!


Diane

Don't forget to click the Subscribe to 100 Computer Tips in 100 Days via email link on the right side of the screen so you get email alerts when Diane adds a new post.

Want more tech news or interesting links? You'll get plenty of both if you keep up with Diane McKeever, the writer of 100 Computer Tips in 100 Days, by subscribing to her Facebook posts or visiting her web page, www.dianemckeever.com . 


Monday, March 24, 2014

Windows 8.1 - Touch Screen Actions

Amazing Windows 8.1 Tip:

Working With a Touch Screen

Many of the directions for Windows 8.1 actions call for you to tap, pinch, slide or swipe. I thought you should see what each of these actions looks like and the result you should expect. I've also included the mouse alternative in case you don't have a touch screen.

In general, here are the mouse/touch equivalents
Mouse              Touch
Click                  Tap
Double Click      Double Tap
Right Click         Press and Hold, then release when a box appears
Drag                  Drag


Direction
Touch Action
Mouse Action
What it Does
Tap
Tap with one quick down up movement on an item. Just like striking a key on the keyboard.
Click the left mouse button once
Opens, selects, or activates whatever you tap.
Press and hold

Press your finger down and hold for about a second.
Click with the right mouse button
Shows info to help you learn more about an item or opens a menu specific to what you're doing. For example, press and hold a tile on the Start screen to rearrange, resize, or pin it. Only works for some items.
Pinch or stretch to zoom

Touch the screen or an item with two or more fingers, and then move the fingers toward each other (pinch) or away from each other (stretch).
Hold down the Ctrl key and press the + or - key
Visually zooms in or out, like with pictures or maps. A good place to explore this is the Start screen.
Slide to scroll

Drag your finger on the screen.
Just as with other windows, use the scroll bar along the bottom of the screen
Moves through what’s on the screen. Similar to scrolling with a mouse.
Slide to rearrange

Press and briefly drag an item in the direction opposite the way the page scrolls, and then move it wherever you want. (For example, if you would scroll left or right, drag the item up or down first.) When you've moved the item to the new location, let it go.
Hold down the left mouse button and drag the item.
Moves an item.
Swipe to select

Swipe an item with a short, quick movement in the direction opposite the way the page scrolls. For example:
If the page scrolls left or right, swipe the item up or down to select it.
If the page scrolls up or down, swipe the item left or right to select it.
Click once with the right mouse button
Selects an item, and often brings up app commands. A good place to explore this is in the Mail app.
Swipe or slide from the edge

Starting on the edge, either swipe your finger quickly or slide across the screen without lifting your finger.
Move to the appropriate area of the screen and hold down the left mouse button and drag in the appropriate direction. See “What it does” column for examples.
·        Open the charms (Search, Share, Start, Devices, Settings). Swipe in from the right edge.
·        Open a recently used app. Swipe in from the left edge. Keep swiping to switch between all of your recently used apps.
·        Open another app at the same time. Slide in from the left edge without lifting your finger and drag the app until a divider appears. Then move the app where you want it, and slide the divider to adjust the app size.
·        See a list of recently used apps. Slide in from the left edge without lifting your finger, and then push the app back toward the left edge.
·        Show commands for the current apps, like New and Refresh. Swipe in from the top or bottom edge.
·        Close an app. Slide down from the top edge without lifting your finger, and then drag the app to the bottom of the screen.


My book,  Amazing Windows 8.1 Tips, will be available shortly. Click the Subscribe button on the right so I can let you know when it's ready for purchase.

Happy Computing!


Diane

Don't forget to click the Subscribe to 100 Computer Tips in 100 Days via email link on the right side of the screen so you get email alerts when Diane adds a new post.

Want more tech news or interesting links? You'll get plenty of both if you keep up with Diane McKeever, the writer of 100 Computer Tips in 100 Days, by subscribing to her Facebook posts or visiting her web page, www.dianemckeever.com . 


Named Cells and Ranger in Excel

Great Computer Tips Named Cells and Ranges in Excel Naming cells Cells already have names such as A1, B27, etc. but you can also give them n...