Thursday, February 28, 2013

Tip #28 - Reply vs Reply All


100 Computer Tips in 100 Days

Tip #28 - Reply vs Reply All


This is a hot topic for many people and it is an action that has gotten people in trouble over the years. There is a story about how in 2009, the State Department servers were crippled when email messages went out to many thousands of diplomats and then many of the recipients clicked Reply All to ask to be removed from the distribution list. This resulted in many other people using Reply All to tell folks to not use Reply All if they only wanted to send the message to the person that initiated it. All of this email traffic stressed the capacity of the system, forcing the under secretary of state to send a cable (who knew people still used cables) to tell people to avoid using Reply All.

With our mailboxes filling up rapidly every day, let’s do a little thinking before choosing between Reply and Reply All.

When you want to reply to an email you have two choices, Reply and Reply All. Reply sends the response to just the sender, while Reply All sends that same response to everyone who received the original email. Before you click the Reply button or Reply All button, ask yourself if it is important that everyone who has gotten the original message needs to know how you respond.

If you are part of a committee and a member is asking everyone’s opinion about a topic, Reply All might be a good choice. If your friend has shared cute pictures of her puppy with a group of people and you want to respond, Reply would be the appropriate choice.

AOL is looking into displaying pictures of all of the recipients of an email rather than just the string of names to see if this helps remedy the Reply All problem. The thinking is that if you could see the faces of the people who would be reading the response you might think twice about the wisdom of using Reply All. I don’t know where AOL thinks they would get all of those pictures from but it might be an idea worth trying.

Happy computing!

Wednesday, February 27, 2013

Tip #27 - Word's Colorful Underlines


100 Computer Tips in 100 Days

Tip #27 - Word's Colorful Underlines


I’m sure that you've noticed that your Word document is usually covered with colorful underlines. Starting with the 2007 version the underlines were red, green or blue.

The red underline indicates that a word is not in the program’s dictionary. If you click with the right mouse button on the underlined word you will see a menu of choices beginning with spelling alternatives. If the word is spelled correctly you should choose “Add to Dictionary” so that it does not question your spelling of that word again. It will even offer your addition as an alternative if you misspell it in the future.

The green underline indicates that there is a grammatical error. For example, if you  type “The boys was happy.” a green line will appear under “boys was” to let you know that the phrase should be either “boys were” or “boy was”. The term grammar is taken in its broadest meaning. If you insert two spaces between words or an extra space before a period, you’ll also see a green underline.  

The blue wavy underline means a "possible word choice error." Even though the text is both grammatically correct and correctly spelled as is, Word thinks you might have intended a different word. The sentence, “The whether is frightful.” will produce a blue underline under “whether” questioning if you wanted to use “weather”. And in this case, Word is right.

You can modify how these are tracked in your document by going to the File tab à Options, which is along the bottom of the box. Click “Proofing” on the left. Use the check boxes and the Settings button to customize the way Word proofs your document.

On the Apple you’ll access these options by clicking on the Word icon in the upper left corner and choosing Preferences. In the window that appears, click on Spelling and Grammar.

Happy computing!

Tuesday, February 26, 2013

Tip #26 - Indenting Text in Excel

100 Computer Tips in 100 Days

Tip #26 - Indenting Text in Excel


Another action that really frustrates me is when people indent text before they start to type the cell entry by hitting the spacebar a few times. I don’t know how they keep track of how many “spaces” they should add before typing. The correct alternative is to use the Increase or Decrease Indent options. I just typed the list to the left. Then I selected specific cells in which I wanted an indent and clicked the Increase Indent option. Each time you click the Increase Indent option the text in the cell is indented a little further. If you indent too far, you simply use the Decrease Indent option.

If you apply both of this and the previous tip, you’ll find that it takes a lot less effort to produce your Excel document.

Happy computing!

Monday, February 25, 2013

Tip #25 - Wrapping Text in Excel

100 Computer Tips in 100 Days


Tip #25 - Wrapping Text in Excel


There are some things people do in Excel that frustrate me. I know that they either missed some fundamental Excel training along the way or that they've been using Excel for a long time and haven’t noticed some of Excel’s newer features.

One thing that I see people doing is breaking words apart on separate lines, as in the first group of headings in the image to the right.  What you should do is type all of the words and then use the Wrap Text option. This will wrap the text on as many lines as are needed. If you resize the column the text will rewrap. If you want a particular word to start a new line you can use Alt + Enter to force a “line break”.  Keeping the column heading in one cell rather than breaking it up across several rows is important when you use advanced features of the program such as filtering, sorting, pivot tables and mail merge. If you were to create a pivot table you could be presented with multiple fields called “total” because that’s what was in the last row.

Check out tomorrow's tip which will also help you use Excel more effectively.

Happy computing!

Sunday, February 24, 2013

Tip #24.- Initiating a Google Search with a Right Click

100 Computer Tips in 100 Days

Tip #24 - Initiating a Google Search with a Right Click


This is a cool tip that I only learned recently, and I learned it by accident! When you are in a browser, any browser, and you select a phrase, you can then click with the Right mouse button (Apple users should use Ctrl click) and one of the choices you will see is to Search Google for the phrase you have selected. No more copying and pasting into the search box.

That’s it! That’s today’s tip, short and sweet, but one that I think you will use a lot.

Happy computing!

Saturday, February 23, 2013

Tip #23 - Scrolling wheel – scrolling left and right and then some!


100 Computer Tips in 100 Days

Tip #23 - Scrolling wheel – scrolling left and right and then some!


Since the scrolling wheel was introduced to the mouse, scrolling has become so much easier. You don’t have to move the mouse on the scrolling bar on the window to go up or down. The scrolling wheel also allows you to scroll horizontally, left or right, but that’s not obvious at all.

To activate the left/right feature you have to click the scrolling wheel, that’s right, the scrolling wheel is also a button! When you click the scrolling wheel you will see the icon pictured here. Now move your mouse (without clicking anything) just above, below, to the left or to the right of the icon. The further you move away from the icon the faster you scroll, so watch out! To turn off the scrolling, click the scrolling wheel again.
Sorry to say I haven’t been able to find anyway to accomplish this on laptops with track pads or on Apple mice, although Apple’s new Magic Mouse allows you to swipe left and right to scroll.

This button is especially helpful in Excel or webpages that require a left right scroll.

Some other uses of the Scrolling Wheel:

Close Browser Tabs Quickly
I routinely have many tabs open in my browser at any given time. If I want to close a tab, I have to click it, then click the little x that appears on the tab. That's one more click than I prefer, and it makes a tab active that I'm planning to close anyway. Crazy, right?

If you wheel-click any tab in your browser, boom, it's gone. No need to make it active first, no need to click on the “x”. Just wheel-click, and, boom, it’s closed.
Open Links in a New Tab
When you wheel-click a link in most browsers, that link opens immediately in a new tab rather than changing the content of the current tab. This is especially important when you’re comparing items and want to move back and forth between tabs.

Incidentally, you can accomplish the same thing by holding down the Ctrl key and left-clicking a link. But why bother with that when you can just as easily click the middle mouse button?


Happy computing!

Friday, February 22, 2013

Tip #22 - Comparing Worksheets in an Excel Workbook


100 Computer Tips in 100 Days

Tip #22 - Comparing Worksheets in an Excel Workbook


Even if you love Excel as much as I do, I bet at times you find it frustrating, particularly when you want to compare two or more worksheets in the same workbook. There’s a lot of switching between sheets trying to remember what one looked like while you looked at another. There is a better way.
What you’re looking to do is create a new window to house the second worksheet. Here’s how you do this:

  1. From the View tab, Window group choose New Window
  2. Then, still in the the View tab, in the Window group choose Arrange All
  3. In the box that pops up, choose the way you would like your windows arranged. Click the checkbox “Windows of active workbook”. Click OK.  Clicking the checkbox for “Windows of active workbook” is particularly important if you have more than one workbook open.

For my Apple friends or for those who are using a pre-2007 version of Microsoft Office, these controls are in the Window menu.

I generally choose arrange vertical which puts one window on the left and the other on the right. Tiled is a good choice if you have more than two windows open.

Happy computing!

Thursday, February 21, 2013

Tip #21 - Resizing Pictures from the Center


100 Computer Tips in 100 Days

Tip #21 - Resizing Pictures from the Center


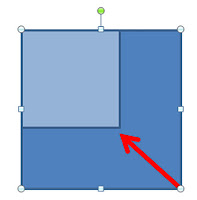
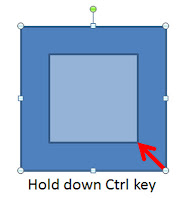
You are putting some final touches on your Word, PowerPoint, Publisher, or Excel document and you want to make a picture a little larger. But because it took you so long to get the picture placed just where you want it vertically and horizontally, you decide to just leave it alone. You tell yourself if you resize it using the corner resize handles then you’ll have to spend more time  than you really have moving it left, right, up or down. Not so. What you need to do is resize the picture around the center rather than from a corner.

As you probably know, when you select a picture you see resize handles in the four corners as well as half way along each of the four sides. To keep the picture in proportion I’m betting you always use the corner handles to resize it. When you do this the two sides that make up the corner you are using become resized. As a result it changes how the picture “sits” in the document.

Here’s the way to make the picture stay where you put it in the first place. Hold down the Ctrl (Alt) key while resizing the picture, this will resize it from the center. Those of you who have problems keeping your layout design consistent while resizing pictures will appreciate this tip.

Happy Computing! See you tomorrow. - Diane

Wednesday, February 20, 2013

Tip #20 - Group Edit in Excel


100 Computer Tips in 100 Days

Tip #20 - Group Edit in Excel


Wait till you hear this juicy Excel tip. Let’s say you have created a workbook that has sheets for all twelve months and then you realize that you need to make the same change to all the sheets. If you’re not aware of group edit you are relegated to making the change 12 times! Never again! What you need is group edit.

To go into the group edit:
  • At the bottom left of your screen, click the first sheet you want to select (I’ll call this the January sheet)
  • Hold down the Shift key
  • Click the last sheet you want to select (I’ll call this the December sheet)

Now you’re in the group edit mode. The name of your document displayed in the title bar of the window will include (Group), as you can see in the image above. Now make your change to the active sheet (the sheet with the bold name) and the change is made on all of the sheets. Quite a time saver, right?
Note: If the sheets you want to group are not consecutive use the Ctrl (Command) key to select them.

Getting out of the group edit

Once you've made your changes, you’ll want to exit the group edit in order to make changes in individual sheets. The method you use depends on whether or not you have selected all of the sheets in the workbook.
  • If all of the sheets in the workbook were selected, click on a sheet that is not the active sheet and you’re out of group edit.

If you have sheets in the workbook that were not included in the group edit, click on one of those and you’re out of group edit.

Happy Computing!

Diane

Buy my book at Amazon.com. It's only $14.99 and it's packed with 100 Amazing Computer Tips! They're nicely organized and really easy to follow.

Don't forget to click the Subscribe to 100 Computer Tips in 100 Days via email link on the right side of the screen so you get email alerts when Diane adds a new post.

Want more tech news or interesting links? You'll get plenty of both if you keep up with Diane McKeever, the author of 100 Computer Tips in 100 Days, by subscribing to her Facebook posts or visiting her web page, www.dianemckeever.com . 

Tuesday, February 19, 2013

Tip #19 - Selecting Items

100 Amazing Computer Tips

Tip #19 - Selecting Consecutive and Non-Consecutive Objects (files, folders, etc.)

When you click on something on your computer you have selected that item, whether it is a file, folder, email, picture, icon, window, etc. Generally you select something so that you can move it, delete it or format it. So often you need to select a group of files to delete, move or copy. It’s tedious to do that to individual files. Instead of selecting them individually, use the Shift or Ctrl (Command) keys to select the group.

Selecting Consecutive Items
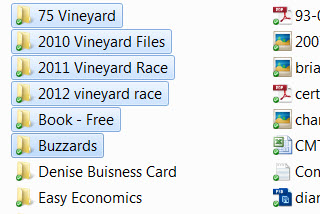
A group of consecutive files selected
The Shift key is the secret to selecting consecutive items. When you need to select a series of folders that are adjacent to each other here's what you do:
  1. Click on the first folder or file
  2. Hold down the shift key
  3. Click on the last folder or file
In the picture to the right, I clicked once on the 75 Vineyard folder, held down the Shift key and clicked on the Buzzards folder. Now if I wanted to move or delete these folders I could do that in one action.

In Word or Excel you can use the same technique to select a range of text or cells. 

In Word click just to the left of the first word you would like to select. Scroll down to the end of the text you would like to select, hold down the Shift key and click. It works like a charm and you don't have to hold down the mouse button and drag through the text. 

In Excel, just as you did in Word, click on the first cell you would like to select. Scroll down to the end of the area you would like to select, hold down the Shift key and click the last cell. Selecting without cursing, brilliant! 

Selecting Non-consecutive Items
The Ctrl key (Command key on the Apple) is the secret to selecting non-consecutive items. In the picture above, suppose we wanted to select "75 Vineyard", "2012 Vineyard Race" and "Buzzards" at the same time. Here's what you would do:
  1. Click on the first folder or file (75 Vineyard)
  2. Hold down the Ctrl (Command) key
  3. Click on the second folder or file (2012 Vineyard Race)
  4. Continue holding down the Ctrl (Command) key and clicking on files/folders until you have selected all you need
You can do this in the Finder window, Word, Excel, your email program, lots of places. Give it a go and let me know what you think.

Happy Computing!

Diane

Buy my book at Amazon.com. It's only $14.99 and it's packed with 100 Amazing Computer Tips! They're nicely organized and really easy to follow.

Don't forget to click the Subscribe to 100 Computer Tips in 100 Days via email link on the right side of the screen so you get email alerts when Diane adds a new post.


Want more tech news or interesting links? You'll get plenty of both if you keep up with Diane McKeever, the author of 100 Computer Tips in 100 Days, by subscribing to her Facebook posts or visiting her web page, www.dianemckeever.com . 

Monday, February 18, 2013

Tip #18 - Great Windows Keyboard Shortcuts


100 Computer Tips in 100 Days


Tip #18 - Great Windows Keyboard Shortcuts

Sorry, this tip is not for my Apple friends.

Here are some keyboard shortcuts for those of you who enjoy using your keyboard rather than a mouse. Note that they use the neglected Windows Key, the one that has the windows flag logo on it. Striking Windows Key all by itself brings up the Start menu.

Windows Key + R – Opens the Run Program Dialog
Windows Key + M – Minimize all windows
Windows Key + Shift + M – Maximize all windows
Windows Key + F – Find files on your computer
Windows Key + E – Open My Computer window
Windows Key + L – Lock your computer

That minimize all windows might come in handy when the boss comes in!

As long as you’re sitting in front of your computer, try these shortcuts out. You may think they’re cool.

Happy Computing!

Sunday, February 17, 2013

Tip #17 - Using the Right Mouse Button


100 Computer Tips in 100 Days


Tip #17 - Using the Right Mouse Button


Those of you who already use the Right Mouse Button (Ctrl + click for you Apple folks) don't have to read any further but I find that many people still do not use it.  This post is for them.

I once heard a tech support person advising a user to never click on the right mouse button because it would only get them in trouble!!! Nothing could be farther from the truth. The right mouse button actually holds all of the commands in your computer, displaying the correct options available at that moment in time.

Try typing some text in your favorite word processing program. Select the text and leaving your mouse on the selected text, right click the mouse button. You should see a shortcut menu listing actions you can take such as cut, copy, spell check, etc. Move over to this shortcut menu and make a choice using your LEFT mouse button.

Remember: Only use the right mouse button to see your options, use the left mouse button to choose an option.

This saves a lot of time because you’re not checking out a series of menus or tabs to find a particular command, it’s right there on the shortcut menu.

Happy Computing! See you tomorrow. - Diane

Saturday, February 16, 2013

Tip #16 - Automate Data Entry with AutoCorrect


100 Computer Tips in 100 Days

Tip #16 - Automate Data Entry with AutoCorrect


The AutoCorrect option from the File tab.

I’m sure you've seen AutoCorrect in action in your Word documents. For those of you who like to press the Enter key at the end of each line (we’ll talk to you another time), you've noticed that Word automatically capitalizes the first character of the next line (technically it’s a new paragraph but we’re not going there now either). You might not have noticed that Word will automatically correct other common spelling/typing errors without asking you about them. If you accidentally type “teh” it will be automatically changed to “the”. Get the “i” and the “e” in the wrong positions in “receive” and it’s fixed automatically. Imagine how many misspellings you would have if Word wasn't helping you!
Creating your own AutoCorrect
option.

I want to show you a terrific shortcut -- how you can create your own AutoCorrect entries so that when you type “usl” Word changes it to “US Lend Inc”, the name of your company. To create your entry, Click the File tab à Options à Proofing à AutoCorrect Options (Tools menu, AutoCorrect for Apple users).

Use the “Replace:” box to enter the text that you will type in the document (no spaces please) and use the “With:” box to identify the replacement text. When finished click the “Add” button.

Now try it out in your document. Type your “replace” text and press the spacebar. Voila!  Now get creative. You can insert paragraphs of information. Maybe you need a disclaimer inserted in some documents, make an autocorrect entry for it. In that case you would select the text in the document first and then go to the File tab à Options à Proofing à AutoCorrect Options. The “With:” box is populated with the selected text. Type an entry in the replace box, click Add and you’re done.

Note: Be sure that your “replace” text doesn't spell a word or you’ll never be able to use that word again!


Happy Computing! See you tomorrow. - Diane

Friday, February 15, 2013

Tip #15 - Sorting in Excel


100 Computer Tips in 100 Days


Tip #15 - Sorting in Excel


People love to use Excel to make lists. Lists of names, products, sales, you name it, someone has kept a list of it in Excel. The row/column structure in Excel makes it an excellent choice for these lists. When setting up a list it is important that you do not leave any blank rows or columns within your list. In other words, don’t skip a few rows because you want to break the information apart by department or date or anything else. These blank rows or columns will make it difficult for you to sort or filter the information in your lists. It’s fine to have information missing within a row or column but entirely blank rows and columns are a big no-no.

Once you have checked to make sure there are no blank columns and rows you’re almost ready to sort. Before you sort, you should take a minute to format the header row, usually row 1, by clicking the row heading (row number) and choosing a format from the Home tab in the Font group. I like making that row bold and centered. This step identifies for Excel that row 1 should not be sorted into the information in that column. It’s really annoying to see the row label “first name” in the “f” section of names. If that happens use the undo button (Ctrl + z).

Now you’re all set to click on a cell in the column you want to sort by and then click the Sort and Filter option on the Home tab in the Editing group. You can choose to sort ascending or descending. This will be represented by the A-Z button or Z-A button. Older versions of Excel have the Sort command in the Data menu. Custom sort will bring up a dialog box so you can identify other types of sorts or a series of sorts.
The Sort command is on the Home tab as well as the Data tab.

You’ll notice that when you do a second sort the first sort will be retained as much as possible. If you wanted the list in the screen shot on this page sorted by grade and within the grade groups by last name, you would sort the last name column and then sort the grade column. 

Happy Computing!

Diane

Buy my book at Amazon.com. It's only $14.99 and it's packed with 100 Amazing Computer Tips! They're nicely organized and really easy to follow.

Don't forget to click the Subscribe to 100 Computer Tips in 100 Days via email link on the right side of the screen so you get email alerts when Diane adds a new post.

Want more tech news or interesting links? You'll get plenty of both if you keep up with Diane McKeever, the author of 100 Computer Tips in 100 Days, by subscribing to her Facebook posts or visiting her web page, www.dianemckeever.com . 

Thursday, February 14, 2013

Tip #14 - Permanently Deleting Files


100 Computer Tips in 100 Days

Tip #14 - Permanently Deleting Files


I think that almost everyone knows that they can delete files by dragging them to the recycle bin OR selecting them and pressing the Delete key OR right clicking on them and choosing Delete. But where do they go? They go into the Recycle Bin (Trash Can) and periodically you need to empty that. Let's assume that you have a document that you REALLY didn't want to have on your computer any longer and want to permanently delete it in one action. You can and here's how.

Select the file by clicking on it. Hold down the Shift key and tap the Delete key. A little window will pop up asking if you are REALLY sure you want to PERMANENTLY delete this file. Click Yes if you really do.
BTW, try this in your email program. It generally works there too. You can delete emails without sending them to the Trash folder.

Since we’re talking about trash, if you’re tired of being asked if you’re sure you want to put something in the trash every time you delete something, here’s another good tip. Right click on the Recycle Bin and left click on Properties.  Uncheck “Display delete confirmation dialog”. Now you can delete without that annoying “are you sure” prompt. Whew!


Happy Computing! See you tomorrow. - Diane

Wednesday, February 13, 2013

Tip #13 - Freezing Panes in Excel


100 Computer Tips in 100 Days

Tip #13 - Freezing Panes in Excel


When working with an Excel list you often need to use many columns and rows, more than can fit on the height or width of the screen. As a result you have to scroll left and right as well as up and down to view your data. The problem with this is that important information is often in the first column or two and in the first row. When you scroll this information is no longer visible. That’s where Freezing Panes is very useful.
In this example we want to freeze the panes in Excel
so that as we scroll to the right to fill in additional
columns of information we will still be able to view
columns A and B.

For example, in the screen shot on the right, there is name information in the first two columns that you might want to freeze in place. You also want to freeze the column headings in row 1 so you can see them when you scroll down the sheet. To do this you should click on cell C2. This step of selecting cell C2 (in this example) is important because the rows above and the columns to the left the active cell will be frozen.

From the View tab in the windows group choose Freeze Panes and then click on Freeze Panes again. As you will see, other choices are Freeze Top Row or Freeze First Column, useful if that is what you want to do. Now take a test drive. Use the scroll bars to scroll up and down as well as left and right. Isn’t it a miracle!

It always astonishes me to see how many experienced Excel users are struggling because they don’t know the secret of freezing panes.

Here’s a bonus tip for PC users. Did you know that the wheel on your mouse is also a button? It’s particularly helpful in Excel where you need to scroll left and right. Click the mouse button. You’ll see the circle pictured here. Now all you have to do is move your mouse away from this circle, to the left, right, above or below and the screen will scroll. The further you move from the circle, the faster you will scroll so be careful! This takes a little getting used to but it’s easier than using the left/right scroll bar.


Happy Computing! See you tomorrow. - Diane

Tuesday, February 12, 2013

Tip #12 - Signatures in Outlook & Other Programs


100 Computer Tips in 100 Days

Tip #12 - Signatures in Outlook (and other programs, check for them in your email settings)


Most people who use Outlook at work are required by their employers to use a signature on their emails. This is a very important addition to your email because it becomes your business card. If you’re not using Outlook, look for a signature feature in your email program. It’s probably there.

Your signature should include your full name, title, company name, company tag line, mailing address, phone number, website and email address. Clearly, it would be tedious to type this on every email, which is where the signature feature comes in.

The signature dialog box in Outlook.
Notice that I have five signatures
defined.
Outlook allows you to have multiple signatures. I feel that you should have a second abbreviated signature for replies. This could simply be your name, phone number and email address.

In addition to using the signature feature to add contact information to new and reply emails, there are some other signatures you might consider creating. For example, if you have to send out a weekly reminder to the staff, you could put the contents of the reminder in a signature. Then to start a new reminder email, click the signatures button and choose the appropriate “signature”. Don’t worry about selecting the current signature, since you can only use one signature in an email, the default signature will be replaced.

How many signatures do you think you need?


Happy Computing! See you tomorrow. - Diane

Monday, February 11, 2013

Tip #11 - Important Keyboard Shortcuts


100 Amazing Computer Tips


Tip #11 - Important Keyboard Shortcuts


Many people resist using keyboard shortcuts because they feel they're hard to remember and they have better things to do with their mind. I certainly agree with this but I feel that there are a few shortcuts that are worth working on because they make you more efficient. And in some cases, they are more than shortcuts because there are times you cannot use menus to accomplish these actions.

Two are very easy to remember because the keyboard shortcut is the same as the first letter of what they do. These are Ctrl + s for Save and Ctrl + p for Print (or Command key in the Appleland).
Keyboard shortcut keys Undo, Cut, Copy and Paste.
In addition to these simple shortcuts I would also encourage you to learn and use four more, undo, cut, copy and paste. These are not going to seem as logical as Print and Save unless you know the thought process behind how they were assigned. If you look at your keyboard (or the picture below) you will see that on the bottom row, left side we have Z, X, C and V all in a row. When you use these keys in conjunction with the Ctrl key (remember it's the Command key in the Appleland) you will execute Undo, Cut, Copy or Paste.

The first time I saw these shortcuts in use was on the keyboard for my first Macintosh in 1984.  These keys actually had the words Undo, Cut, Copy and Paste written on them as well as the actual letters, and there are still keyboards that do this. Look carefully at your keyboard, you might be surprised!

To Recap:
Save     Ctrl + s
Print     Ctrl + p
Undo    Ctrl + z
Cut       Ctrl + x
Copy     Ctrl + c
Paste    Ctrl + v

Happy Computing!

Diane

Buy my book at Amazon.com. It's only $14.99 and it's packed with 100 Amazing Computer Tips! They're nicely organized and really easy to follow.
Don't forget to click the Subscribe to 100 Computer Tips in 100 Days via email link on the right side of the screen so you get email alerts when Diane adds a new post.


Want more tech news or interesting links? You'll get plenty of both if you keep up with Diane McKeever, the author of 100 Computer Tips in 100 Days, by subscribing to her Facebook posts or visiting her web page, www.dianemckeever.com . 

Sunday, February 10, 2013

Tip #10 - Duplicating with the Ctrl Key

100 Amazing Computer Tips

Tip #10 - Duplicating with the Ctrl Key


One of the great things about having one company, like Microsoft, dominate the software environment is that there is a lot of consistency in the software for its many programs. An example of that is the ability to Ctrl + mouse drag (hold down the Ctrl key, hold down the mouse button and drag) to duplicate objects. In this case "objects" can refer to text, calendar events, worksheets or graphic objects. Here are some of the ways I use Ctrl + drag.

Outlook - When I set up an appointment with a new client I put in all kinds of information in the event window such as directions, phone numbers and the like. When I have a second appointment I want to avoid entering that all again so I find a previous appointment, hold down the Ctrl key and drag the appointment to another day. When I release the mouse button the duplicate of the original appointment stays. Now all I have to do is change the date of that duplicated appointment and I'm all set.

Excel - When you want to duplicate a worksheet in Excel, put your mouse on the sheet tab, in the lower left side of the screen, of the sheet you want to duplicate, hold down the Ctrl key and drag the mouse to the right or left. As you do this you will see a little black triangle indicating where the duplicated sheet will be placed. When you release your mouse button the sheet will have been duplicated.

Word - To duplicate text that you have in a Word document you use the same technique. First, you have to select the text you want to duplicate. Then leave your mouse on the selected text, hold down the Ctrl key and drag the text to a new location. When you drag your mouse in Word you will see a dotted vertical line indicating where the duplicated text will be placed.

PowerPoint or Publisher - Here Ctrl + drag really comes in handy. If you've drawn a box, created a line, inserted a graphic/clip art, etc., and want to duplicate it, use Ctrl + drag. Click on the object, hold down the Ctrl key, hold down the mouse button and drag. When you release the mouse button you have copied the original object. Imagine if you want to scatter a bunch of stars on the page, rather than copying and pasting and ending up with a pile of the stars in the center of the page, you can use Ctrl + drag to duplicate them all over the page. It’s a snap!

Just remember to release the mouse button BEFORE you release the Ctrl key. 

Happy Computing!

Diane

Buy my book at Amazon.com. It's only $14.99 and it's packed with 100 Amazing Computer Tips! They're nicely organized and really easy to follow.

Don't forget to click the Subscribe to 100 Computer Tips in 100 Days via email link on the right side of the screen so you get email alerts when Diane adds a new post.


Want more tech news or interesting links? You'll get plenty of both if you keep up with Diane McKeever, the author of 100 Computer Tips in 100 Days, by subscribing to her Facebook posts or visiting her web page, www.dianemckeever.com . 

Saturday, February 9, 2013

Tip #9 - Stopping A Runaway Printer

100 Computer Tips in 100 Days


Tip #9 - Stopping A Runaway Printer

How often did you accidentally send a document, in its 100 page entirety, to the printer when you only wanted to print page 6? It makes for a great Carol Burnett or Lucy Ricardo moment but it can be very frustrating  Here's how you should deal with this problem.

Step 1
Remove any paper in the paper intake area. Depending on the printer you may be able to accomplish this by taking out the paper cassette or you can just reach in and grab the paper. This will at least give you some time to consider your other options.


Step 2
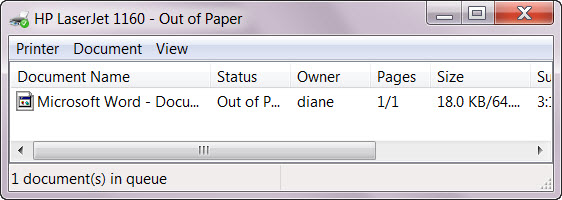
Look in the lower right side of your monitor, in the tray area. You might see a little printer icon. You may have to click on "show hidden icons" to see the printer. When it appears in the tray area, double click it.

You will see the printer dialog box. This is good because you will be able to cancel the print job. From the Printer menu choose "Cancel all documents". You'll be asked to confirm this action.
You may have to restart your computer as well as the printer to remove the document from the print spooler.

Step 3
Turn everything back on, put the paper back in the printer and all should be good. If not, repeat steps 1 and 2. 

Happy Computing! See you tomorrow. - Diane

Friday, February 8, 2013

Tip #8 - Grow or Shrink the Font Using the Keyboard

100 Computer Tips in 100 Days

Tip #8 - Grow or Shrink the Font Using the Keyboard
This tip works in most programs where you enter text such as Word or your email program. It works on both the PC and Apple and is really easy to learn.

First you need to type some words and then select the text you want to make larger or smaller (see the blog entry on selecting text). On your keyboard find the following keys - Shift, Ctrl (Command for Apple) and the Greater Than key (>) or the Less Than key (<). Are you getting any idea of where we're going yet?

With the text selected hold down the Shift and Ctrl (Command) keys at the same time. With both of them depressed, strike the greater than key to make text larger (greater??) and the less than key to make the text smaller (lesser). That's it. The reason this is pretty cool is that you don't always have access to the grow/shrink feature in the program but you can use this keyboard alternative anyway. Give it a try.

Happy Computing! See you tomorrow. - Diane

Named Cells and Ranger in Excel

Great Computer Tips Named Cells and Ranges in Excel Naming cells Cells already have names such as A1, B27, etc. but you can also give them n...